Search This Blog

Friday, December 31, 2010

Formatting Disk using DiskPart

Quite a while i’ve not post about Hyper V content.

Let look into several command that you should execute when formatting disk. Wait, won’t it be easy using Computer Management snap in to format a disk.

Well, you’re right but…you will not have Computer Management when Hyper V host machine is install with Server Core version.

Hope this command come to handy when you format a disk either local or iSCSI LUN presented to Hyper V host.

1. Execute Diskpart command.

image

2. Execute List Disk to view the disk available on the Hyper V machine

DISKPART > List disk

image

3. We are going to format disk 3. Execute select disk 3 to select disk 3.

DISKPART > Select disk 3
DISKPART > List disk

image

* indicated disk 3 is selected.

4. If the disk status is offline. Type

DISKPART > online disk

5. View the attribute of the disk. Make sure the disk read-only is not set to Yes.

DISKPART > attribute disk

image

If mark as Read-Only. Key in below command:

DISKPART > attribute disk clear readonly

6. Create primary partition using the entire disk volume.

DISKPART > create partition primary
DISKPART > list partition

image

7. Assign a drive letter

DISKPART > Assign letter =K

image

8. Quick format a disk with NTFS file format

DISKPART > format fs=ntfs quick

image

That’s all. Easy and simple. This is my last post for 2010. Wishing everyone “Happy New Year 2011”.

XOXO, Lai (MS4U.info editor)

Tuesday, December 28, 2010

BMR on Windows Server 2003 using DPM

image
For those who has deployed DPM 2010, you would like to do Bare Metal Recovery on Windows Server 2003 and Windows Server 2008. You would be able to do BMR on Windows Server 2008 using DPM 2010 once you have install Windows Backup Features.
Now, how about Windows Server 2003?
Well, you can’t use DPM 2010 to do BMR for Windows Server 2003. For those who still want to do BMR, you need to separately download SRT on Microsoft Technet- DPM 2007 software. The size is around 341MB and you need to install on Windows Server 2003 operating system.
You can’t install together with DPM 2010 which resides on Windows Server 2008 R2 as this is unsupported.

The installation of SRT (System Recovery Tool) is quite straight forward and configuration is easy as well.
Note:- More information about SRT, please refer to http://technet.microsoft.com/en-us/library/bb808871.aspx

If you want to do BMR on cluster server, you need to apply the following hotfix:- http://support.microsoft.com/kb/947788

Here is some basic configuration that you need to perform.
1. Open DPM System Recovery Tool Console
2. Connect to Active Directory domain with valid domain authentication.
3. Create a schedule that you want the SRT to do recovery set.
Note: – SRT has it own recovery set and different from DPM recovery.
4. Add Computer into the schedule and create recovery set. The computer should be running Windows Server 2003. DPM SRT agent will automatically install into target computer. You need to make sure File and Printer Sharing is enabled.
Wait until the recovery set is complete and is successful.
5. Create a Client Boot Disk (SRTBootClient.iso) from DPM SRT Console.

Recovery
1.Make sure the original machine is down and offline.
2.Insert and boot from Client Boot Disk on new VM. (I’m using VM to test perform recovery. The VM must running legacy Network Adapter)
3. Wait to get IP address configuration or configure the ip address.
4. Open Recovery Center on SRT VM and select the computer that you want to recover. Select Rollback system options.

image

Follow the wizard to complete the recovery.
5. Recovery in progress.

image

Once complete, a HTML report will be displayed and target machine has rebooted.
Note:- The target machine should has identical hardware especially hard disk size should be bigger than original machine.

Additional information:- http://technet.microsoft.com/en-us/library/bb795820.aspx

Sunday, December 26, 2010

Recover Exchange 2010 Mailbox using DPM 2010–Part 1

This section is breaking down into three sections:
Part 1 – Scenario 1 and 2 (This section).
Part 2 – Scenario 3
Part 3 – Scenario 4 (coming soon)

Now let look into how to recover Exchange 2010 Mailbox.
To backup
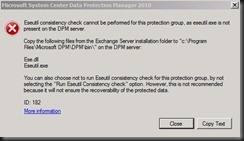
Use Protection tab and create a protection group. The wizard will guide you to complete the step. The only thing that you should take note is ese.dll and eseutil.exe need to copy to C:\Program Files\Microsoft DPM\DPM\bin folder. If you did not, you will get below error message.

2

Enable eseutil.exe on
  • Both log and database when your exchange server is stand alone server
  • Log only when exchange is running DAG.
To recover
1. Create a Recovery database. Using Exchange Management Console (EMS), enter below command

3

New-mailboxdatabase –recovery –name RDB1 –server servername

To View the database
Get-Mailboxdatabase

Now, here got different scenario of recovery. Let look into the most common first before we go deep.

Scenario 1
1. User account and Mailbox deleted
Recovery not possible unless you recovery the user account first using System State recovery. Each user account has unique SID and you can’t create the same name of user account because the the system will create a new SID.

Scenario 2
1. User account and Mailbox account is still intact (not deleted) but message has deleted and the user would like to recover.
a) Set RDB1 as overwrite
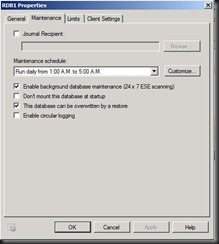
Go to Exchange console > Organization Configuration > Database Management > Select RDB1 > Right Click > Properties > Maintenance tab > Tick This database can be overwritten by a restore.

5

2. Mount RDB1. Use EMS
“Mount-Database RDB1”

3. Use DPM to recover a mailbox. Example: Test1.
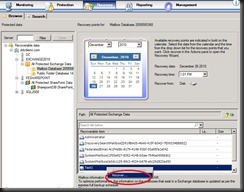
Before that, make sure you have created several recovery point. You cannot restore from the latest recovery point. Once you have done that, login to Test1 account and delete some email.

6

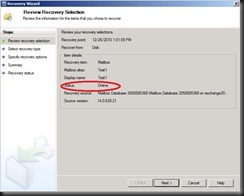
The status is listed “Online” mean the mailbox is still intact.
7

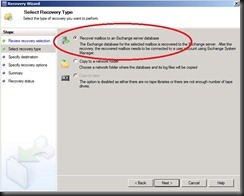
Select Recover to an Exchange Server database
8

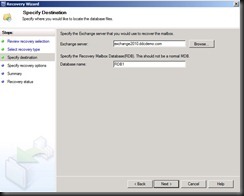
Select Exchange Server which consist of Recovery Database- RDB1
9

Complete the wizard to finish the recovery.
4. Use EMS, to check recovery has transfer to RDB1
Get-MailboxStatistics –Database RDB1'

10

5. Use EMS, to recover mailbox from RDB1
Restore-Mailbox –Identity Test1 –RecoveryDatabase RDB1

11

6.Check that email message has restore using OWA.
This completed Part1- Basic recovery of mailbox when Mailbox is still intact.

Do you want to know more? Click here to check on Part 2.

Saturday, December 25, 2010

Update DPM 2010 with QFE rollup

I just came back from Sri Lanka which completed a DPM project. During my project, i has updated the DPM 2010 to the latest QFE rollup. This QFE rollup has released on Nov 2010.

To download:- Click here

Installation of QFE rollup is quite simple and you need to restart the DPM server after patching the server.

Update from DPM Administrator Console
Once the server has restart, go to Management > Agents tab to upgrade the rest of the protected server agents. The new agent version will be upgraded to 3.0.7706.00.


Manual update installation
1. Navigate to C:\Program Files\Microsoft DPM\DPM\agents\RA\3.07706.0

32 bit- i386\1033\DPMAgentInstaller_KB2250444.exe
64 bit- amd64\1033\DPMAgentInstaller_KB2250444_AMD64.exe

The above path is also the new path for those who's perform manual agent installation.

Thursday, December 23, 2010

How to Connect to DPM 2010 SQL Server?


Well, title look simple but do you know how to connect to DPM 2010 SQL Server which included together as part of the installation.

As everyone thought this is an easy way: Just use SQL Management Studio. Anyway, you’ve tested and enter the server name and authentication but still fail to login.

Here is an additional info that you require in order to successful login into SQL Server for DPM 2010.

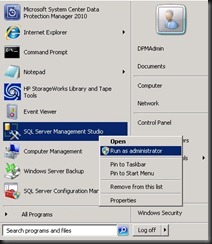
1. Right click SQL Server Management Studio and select Run As administrator.

1

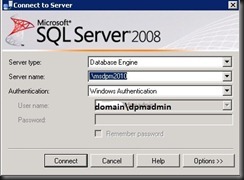
2. Here you need to enter the following on server name

a) dpmservername\msdpm2010 or

b) .\msdpm2010

2

3

Once you’re inside, then you can perform SQL administration work including creating report from predefined sql view.

Simple and Easy,

Since 25th is coming. I Wish “Merry Christmas” to www.ms4u.info  visitors and Happy Holiday.

Tuesday, December 21, 2010

DPM Service Failed When Erasing a Tape

Issue:-


1. I've checked the event log and found the following event


Log Name: Application
Source: MSDPM
Date: 12/20/2010 4:43:55 PM
Event ID: 943
Task Category: None
Level: Error
Keywords: Classic
User: N/A
Computer: Secret
Description:

The description for Event ID 943 from source MSDPM cannot be found. Either the component that raises this event is not installed on your local computer or the installation is corrupted. You can install or repair the component on the local computer.

If the event originated on another computer, the display information had to be saved with the event.

The following information was included with the event:

Unable to connect to the DPM database because the database is in an inconsistent state.


Problem Details:


<__System>19228712/20/2010 8:43:55 AMDpmThreadPool.cs163TrueDBCorruptionExceptionMore than one MediaPool reported for same Media aa1f597b-41d1-418d-b730-530c4f9efeb3Microsoft.Internal.EnterpriseStorage.Dls.DB.DBCorruptionException: More than one MediaPool reported for same Media aa1f597b-41d1-418d-b730-530c4f9efeb3
at Microsoft.Internal.EnterpriseStorage.Dls.DB.Catalog.IntegrityCheck(Boolean condition, String message)
at Microsoft.Internal.EnterpriseStorage.Dls.MMDatabase.ArchiveMedia.GetMediaPool(DbContext sqlContext)
at Microsoft.Internal.EnterpriseStorage.Dls.MMDatabase.MMCatalog.ValidateArchiveMediaNotInOtherAdminPool(DbContext sqlContext, Guid archiveMediaId)
at Microsoft.Internal.EnterpriseStorage.Dls.MMDatabase.MMCatalog.TriggerMediaEraseJob(Guid mediaId, Guid jobId)
at Microsoft.Internal.EnterpriseStorage.Dls.MMInterface.MediaManager.TriggerMediaEraseJob(Guid mediaId, Guid jobId)
at Microsoft.Internal.EnterpriseStorage.Dls.Engine.CMediaManagerServices.TriggerMediaEraseJob(_GUID mediaId, _GUID jobId)
at Microsoft.Internal.EnterpriseStorage.Dls.Engine.CCoreServices.TriggerMediaEraseJob(CCoreServices* , _GUID mediaId, _GUID jobId, tagSAFEARRAY** exceptionResult)


2. Ran the following query and found it returns more than one row

prc_Global_MM_ArchiveMedia_GetMediaPool 'aa1f597b-41d1-418d-b730-530c4f9efeb3'

3. According to Microsoft PSS, they have checked in their internal database and found it is a bug in DPM 2010 which is still under investigation. The workaround to fix the problem is to run the following command:

a) Backup the database
DPMBackup.exe -db

Note:- the command is at C:\Program Files\Microsoft DPM\DPM\bin

b) Copy the DPMDb.bak into another location

Note:- the original backup database is located in C:\Program Files\Microsoft DPM\DPM\Volumes\Shadow Capy\Database Backups

c) Execute below command
SetSharedDpmDatabase -RemoveDatabaseSharing

Note: the command is at C:\Program Files\Microsoft DPM\DPM\Setup

d) Open DPM Administrator Console.

4. After the command succeeded, we perform detailed inventory on the tape library, it succeeded. Then we tried to erase a tape, DPM service did not crash and the job is in progress. Meanwhile, I create a new protection group to backup something to tape; the job was also in progress.

A bug...Gosh..

Thursday, December 16, 2010

Presentation: Building Private Iaas Cloud

Here is the 2nd Day of SCSS 2010 presentation session @ Monash University.

In this session, i have talk about how to build a Private Cloud -Iaas using VMM SSP 2.0, Dashboard and Vkernel Chargeback with Hyper V 2.5.


Slide Presentation

Recording session

Viewing this content requires Silverlight. You can download Silverlight from http://www.silverlight.net/getstarted/silverlight3.

Wednesday, December 15, 2010

Presentation: Implementing Hyper V Virtualization SP1

Today, on Day 1 of System Center Solution Summit 2010 (SCSS) at Monash University, i've presented a session to SCUG members.

In this session i have shared about the updated information about SP1 RC which focus on Dynamic Memory and RemoteFX features.


For those who did not have the chance to attend, you can view the slide and recording. Enjoy!

Slide
Presentation Recording and Demos (Unedited)

Viewing this content requires Silverlight. You can download Silverlight from http://www.silverlight.net/getstarted/silverlight3.

Monday, December 13, 2010

Should I do Teaming or MPIO on iSCSI NIC?


Some people confused when set high availability for iSCSI NIC.

Well, i dont blame them. Let get back to the question

Should I do teaming or MPIO on iSCSI NIC?

If you choose NIC Teaming, then answer is wrong !!!

No, NIC teaming is not supported on the iSCSI interface. Please see more info below:

Public: Network card that is used for connectivity with external clients. NIC Teaming is fully supported on this interface. See Network adapter teaming and server clustering for additional information.

Private: Network card that is used for internal cluster communication. NIC Teaming is NOT supported on this interface.

SAN: Network card that is used for communication to the storage device. NIC Teaming is NOT supported on this interface. Instead use Microsoft Multipath I/O (MPIO) or multiple connections per session (MCS per iSCSI specification) to achieve fault tolerance

Clarification taken from http://www.microsoft.com/windowsserver2003/technologies/storage/iscsi/iscsicluster.mspx

So since now you’re clear here is simple configuration that you should do on setting high availability on iSCSI NIC.

1. Configure iSCSI NIC 1 and iSCSI NIC 2 an ip address

2. Execute iscsicpl command and click “Quick Connect” to connect to iSCSI storage.

You will be able to see the LUN which has presented to your server

3. Select the LUN and click Connect. Do remember to select Enable Multipath and set to use iSCSI NIC 1

Repeat same process for all LUN.

4. On Server core, install MPIO feature

ocsetup MultipathIo /norestart

This will install MPIO feature and will not restart the server

5. Claim all iSCSI attached storage for MPIO

mpclaim -r -i -d "MSFT2005iSCSIBusType_0x9"

The server will restart . After restart, you can execute MPIOCPL.

You will see a new device hardware ID (MSFT2005iSCSIBusType_0x9) in the MPIO Devices tab

6. Now add a second path to each LUN and leave the default Round Robin Load Balancing.

Go to iSCSI Initiator, select the LUN and click Properties

7. Click Add Session > Tick enable Multi path > Click Advanced and select the iSCSI NIC 2.

8. Once complete, click Devices and select MPIO button. You will see two path on the LUN which has set to Round Robin.

9. To verify, execute

mpclaim –s –d

To view all LUN which has claimed in the MPIO

10. To verify MPIO policy according to disk #,

mpclaim –s id <disk #>

Now you have successful learn on how to set high availability on iSCSI NIC.

Sunday, December 12, 2010

HP NIC Teaming on Server Core


Well, I'm a bit sceptical when deploy anything in Server Core at the first place.

As an additional tool from previous post:- http://www.ms4u.info/2009/12/managing-server-core-easy-or-hard-way.html

If you would like to do teaming on DELL Server, please refer to http://www.ms4u.info/2010/02/install-broadcom-advanced-control-suite.html

How about HP NIC Teaming?

1. Go to hp website and navigate to hardware driver.

2. Locate HP NCU (Network Configuration Utility) , download and install into Server Core

3. Then simply start hpteam.cpl from c:\program files\hp\ncu and do the usual GUI based configuration.

Is that simple? Never guess that NCU is working in Server Core.

Thursday, December 9, 2010

Presentation: Hyper V R2 Zero to Hero Demo

Today, i and Kwan (MVP SCOM) has participated in Virtualization and Security Day 2010 @ Monash University. We have presented Hyper V R2 Zero to Hero Demo. Here is the slide and recording of the session.

Slide

Recording
Note:- Sorry dude, no time to fine tune the video recording. To view full screen, click on the "Full Screen" button

Viewing this content requires Silverlight. You can download Silverlight from http://www.silverlight.net/getstarted/silverlight3.

Wednesday, December 8, 2010

ID 10207 When Integrating SCOM 2007 R2 with VMM 2008 R2 SP1 RC

When i try to integrate SCOM with VMM, i have encountered error ID 10207.


This issue occur when i'm using local service account for VMM Service.

Resolution:-
1. On VMM server, execute ConfigureSCPTool.exe -Install . This is located in SCVMM CD under \amd64\setup.
2. Proceed to install "Configure Operation Manager" on SCOM server using SCVMM CD.

Tuesday, December 7, 2010

Dynamic Memory in VMM 2008 R2 SP1 RC

In VMM 2008 R2 SP1 RC, here is the snapshot on how to set the Dynamic Memory.

On Memory -


You can configure Startup memory, Maximum memory and Memory Buffer.

To set memory weight/priority, click on Priority


The top is for CPU Priority and the bottom the where you set memory priority. Rather than sliding bar as what display in Windows Server 2008 R2 SP1 RC, in VMM it is using option. You can select High, Normal, Low or a custom value.

To View the value in VMM Administrator Console, you can add the column to view the similar display as Hyper V Manager snap in.

Upgrade VMM 2008 R2 to VMM 2008 R2 SP1 RC

Last few days ago, product team has released a Release Candidate for VMM 2008 R2 SP1. This SP1 RC included with previous hotfixes and the most important is the support for Dynamic Memory and RemoteFX which available on Windows Server 2008 R2 SP1.

If you have access to MS Connect, you will need to download full installation of VMM 2008 R2 SP1 RC which consist of 3GB+ size. It did not came with a small file similar as other Service Pack or hotfixes.

Without wasting any time, let quicky look into how you should you upgrade to this latest version. There are certain requirement that you need to take note.

Requirement:-

Before upgrade, make sure you have backup the VMM database in case for any failure during the upgrade process.

I have tried to upgrade VMM 2008 R2 SP1 Beta to RC1 but failed. The following error is appeared.


Upgrade process:-

So let move to upgrade VMM2008 R2 to SP1 RC.
1. Put the CD and click on VMM Setup. Upgrade process is similar as doing an installation.


2. Accept the EULA


3. The setup will detect any component that has previously installed and will upgrade the component. Just click Upgrade


4. On SQL Credential, you can enter the authentication or click Next if current login user has the right to access the database.


5.Upgrade in progress. Just wait.


6. Once complete, open the VMM Console.


7. Refresh the Hyper V Host and VMM Library. Proceed to Administration and Select Managed Computer. Right click the Host and select Upgrade Agent.


8. Once upgrade of the agent complete, then the upgrade process is complete. Here is additional colum available after the upgrade.


Simple and easy process.

Saturday, December 4, 2010

SCVMM 2008 R2 SP1 RC has Released

Finally, after a long wait and testing on the  beta version, i'm gladly to announce that SCVMM 2008 R2 SP1 Released Candidate has released to public. This released is to support Dynamic Memory and RemoteFX features which has released on Windows Server 2008 R2 SP RC.

Time for me to remove the beta version and upgrade to RC. Before that, just to let you know, since this is a pre-release version, usage of this is limited to test environments.

For interested users, please download from Microsoft Connect site.- Click here.

Once i have finish downloading the 3GB file, i will post the updated info .

Stay Tuned for more info..

Thursday, December 2, 2010

New Citrix / Microsoft Facebook Forum

Found this website. Check it out when ...

Not sure if it’s a Microsoft or Citrix problem?


Jump on the new Facebook forum to discuss your issue, share ideas, opinions, and information related to Citrix and Microsoft Virtualization products.
http://www.facebook.com/pages/Citrix-and-Microsoft-Support/113004065426683?v=wall

Enjoy!

Friday, November 26, 2010

ERR9999 after VMM SSP 2.0 installation

For those of you who has start the VMM SSP 2.0 installation and encounter below error message:-

" ERR9999 "


Here is some of the thing that you can try to resolve the above issue.

Resolution:-
a) Check on VMM Server and make sure all services (automatic) is started
b) On SQL Database Service, make sure it is started as well.
c) If SQL Database is set to dynamic port (skip this step if using default port 1433), you can go to VMM SSP web.conf file, located in VMM SSP Installation folder\Portal directory


add name="MicrosoftDDTKConnectionString" connectionString="Data source=ddcscvmm,1433; Integrated Security=true; Initial Catalog=DITSC"

Remove 1433 port number. End result should be
add name="MicrosoftDDTKConnectionString" connectionString="Data source=ddcscvmm; Integrated Security=true; Initial Catalog=DITSC"

d) If SQL Server is using default port number (1433), then make sure that during the installation of VMM SSP 2 you are using domain admin account to configure on Application Pool Identity. If not, to solve this issue, navigate to IIS Manager > Application Pool > VMMSSPAppPool > Right Click and Select Advanced Settings. In Process Model - Identity, change to domain\administrator account. Once complete, right click the application pool and Recycle.


Finally, try to browse the VMM SSP web site.

Thursday, November 25, 2010

Opalis Policy- Start Fail Services

I have created a simple opalis policy to automatically start services which has in stop state. In this example, i have created a policy to monitor multiple server on two services: Print Spooler and Netlogon Services.

Here is the policy workflow:-


Scenario:-
Monitor every 5 second on multiple server and services. Firstly, check the status of the services. If the services is stop, then initiate start the service.

Service A - Print Spooler
Service B - Netlogon

Configuration:-
On Monitor Date/Time Object, i have specify to monitor every 5 second.

On Get Service Status A and B:-

You will notice that Computer is listed as [Test VM]. I have created a computer group and put multiple computer together.

On the services, specify
Service A- Print Spooler
Service B - Netlogon

Too bad, no grouping of services that i can create. That's the reason why you will see i have created 2 flow.

On the Start/Stop Service A object:-
 I've specify the object to start the Print Spooler service if the state is stop.

Meanwhile, On the Start/Stop Service B object:-


I've specify the object to start the Netlogon service if the state is stop.


Once you have complete the flow, Execute "Check In" and Click "Start" to start the policy automation.

Finally run a test to stop the Print Spooler Services and Netlogon Services on the monitor server. You will see both services will start automatically. To verify if the service is start by Opalis, you can create another flow at the end to send notification to your email address or Event Viewer.

Here is my sample policy - Click here to enter Opalis Policy folder. Quite simple and easy way to play around with Opalis. I will explore on System Center Integration Pack later. Stay Tuned for more policy...

Sunday, November 21, 2010

Opalis 6.3 has released

Good news again. Opalis 6.3 has released. As reported Opalis 6.3 can install into Windows Server 2008 R2. It took me few hours to get it up and running. Trust me it is not an easy job and if you hope that the installation is "Click Next, Next , Next," then you're wrong.

To summarize, you need to install Opalis 6.22 first, patch with SP1 before move to 6.3.

To download Opalis 6.3 - Click here
Opalis Technet Library - Click here

A sneak preview of additional Integration Pack:

System Center Virtual Machine Manager


System Center Operation Manager


System Center Data Protection Manager


System Center Configuration Manager


System Center Service Manager


Next step is play around with Opalis 6.3. Good Luck on your testing.