I have created a video on how to configure Hyper V for lab environment as part of contribution during Malaysia Virtualization User Group (MVUG) meeting last week.
Enjoy!

Wednesday, January 27, 2010
Saturday, January 23, 2010
Quick storage migration (QSM) via VMM
Recently a lot of people ask about QSM so i've decided to R & D this environment to understand more about the QSM process. Let begin to discuss about QSM.
You may come across to move a VM from one storage location to another storage location on the same host. This mostly happen when you want to move the VM to more larger storage capacity. Quick Storage Migration (QSM) is available in VMM 2008 R2 which relies on Windows Server 2008 R2 Hyper V and Background Intelligent Transfer Service(BIT).
QSM apply within a single host :-
a)To move from local disk to shared storage
b)To move between shared storage device
In theory here is the concept of how QSM migration process work.
a) A QSM is requested through SCVMM R2 between two hosts/clusters or within the same host.
b) A snapshot of the VHD(s) is created .All disk write operations from that point forward go into the differencing disk. The original base VHD is no longer changing since it is in a read-only state.
c) Since base VHD is in read-only state, VMM start to copy the base VHD over the network through BITS (secure copy) to the target location.
d) Once the base VHD is transferred, the virtual machine is put into "Saved State". The VM is offline at this point.
e) The differencing disk and VM state/configuration files are copied through BITS to the target storage.
f) On the target storage, the snapshots are merged to restore the original structure and the original source VM is removed.
g)The VM is resumed on the target storage.
To configure:-
1. While the VM is up and running, Right click the VM that you plan migrate and select "Migrate Storage"

2. Below is the original location.

3. Modify the VM path and Disk path to another location. You must specify the new VM configuration path or the migration will fail.
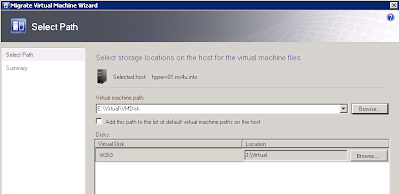
4. Error ID:640 will appear, if you still insist to remain the original VM configuration path. You need to shutdown the VM or saved state the VM. But by doing this, you will have downtime and cannot access the VM during transferring.

5. So remember to change the VM configuration path for "Online QSM". Review the summary before click "Move".

6. Below is the job running process during QSM process.

continue job...

After the job finish, you will realise the VM storage disk has migrated to new location.
Video:- Install Hyper V roles
Hi,
i have created a video on how to install Hyper V roles as part of contribution during Malaysia Virtualization User Group (MVUG) meeting last week.
Enjoy!
i have created a video on how to install Hyper V roles as part of contribution during Malaysia Virtualization User Group (MVUG) meeting last week.
Enjoy!
Friday, January 22, 2010
Hyper V Virtualization Management Tool feature comparison
Just got some update from Microsoft about different types of Hyper V virtualization management tool .


Thursday, January 21, 2010
Video:- Configuring boot from native VHD
Hi,
i have created a video on how to configure boot from native VHD as part of contribution during Malaysia Virtualization User Group (MVUG) meeting last week.
You may notice that i have posted the similar stuff on this url before:-
http://www.ms4u.info/2009/12/boot-from-vhd.html
Enjoy!
i have created a video on how to configure boot from native VHD as part of contribution during Malaysia Virtualization User Group (MVUG) meeting last week.
You may notice that i have posted the similar stuff on this url before:-
http://www.ms4u.info/2009/12/boot-from-vhd.html
Enjoy!
Wednesday, January 20, 2010
Video:- Configuring storage virtualization (Starwind software-iSCSI SAN)
Hi,
i have created a video on how to configure storage virtualization using Starwind software as part of contribution during Malaysia Virtualization User Group (MVUG) meeting last week.
Enjoy!
i have created a video on how to configure storage virtualization using Starwind software as part of contribution during Malaysia Virtualization User Group (MVUG) meeting last week.
Enjoy!
Monday, January 18, 2010
Features comparison SCE 2010 with SCCM and SCOM
Good news!
Just finish attended "Technical Introduction SCE 2010" webcast conducted by Microsoft. One of the good news is "SCE 2010 RC will be available by the end of January and will RTM in April of 2010".
For those interested on virtualization management, SCE 2010 comes with VMM Workgroup Edition which allow you to add five (5) physical hosts with unlimited Virtual Machine management.
Here is some features comparison about SCE 2010 with Configuration Manager:-

Here is some features comparison about SCE 2010 with Operation Manager:-

Sunday, January 10, 2010
Import VHD or VMDK into SCE 2010
SCE 2010 allow you to import Microsoft VHD and Vmware Virtual disk. By default only one (1) library folder is available. Just follow the following steps:-
1. On the Computers pane, click Import Virtual hard disk

2. Import a Virtual Hard Disk wizard open. Select either Import Microsoft VHD or Vmware VMDK.
Make Sure you have store the vhd/vmdk with vmx into SCE library. To open the library, click on "the library folder"

3. By default, the library folder is located in "\\ SCE computer name\MSSCVMMLibary0"
Put VHD or VMDK (Vmware Virtual disk) and VMX (Vmware configuration file) into this library.
4. On the Specify configuration, you can edit the hardware profile by clicking on Change properties

5. SCE will perform a compatibility check on the suitable host. Select your destination host that you would like the VM to reside.

6. Enter the Virtual Machine name and the path for the VM which going to resides.

7. Review the summary before click "Create"

8. Once you click Create. The wizard will start the import process. You will not see any job running as similar as SCVMM. Only Steps and progress indicating the importing process.

9. Once finish, you will see the confirmation status.

1. On the Computers pane, click Import Virtual hard disk

2. Import a Virtual Hard Disk wizard open. Select either Import Microsoft VHD or Vmware VMDK.
Make Sure you have store the vhd/vmdk with vmx into SCE library. To open the library, click on "the library folder"

3. By default, the library folder is located in "\\ SCE computer name\MSSCVMMLibary0"
Put VHD or VMDK (Vmware Virtual disk) and VMX (Vmware configuration file) into this library.

4. On the Specify configuration, you can edit the hardware profile by clicking on Change properties

5. SCE will perform a compatibility check on the suitable host. Select your destination host that you would like the VM to reside.

6. Enter the Virtual Machine name and the path for the VM which going to resides.

7. Review the summary before click "Create"

8. Once you click Create. The wizard will start the import process. You will not see any job running as similar as SCVMM. Only Steps and progress indicating the importing process.

9. Once finish, you will see the confirmation status.

Tuesday, January 5, 2010
Manage Snapshot using SCE 2010
SCE 2010 allow you to create Virtual machine snapshot as similar as SCVMM.
Here is a sneak preview of snapshot in SCE 2010:-
1. To create a snapshot, Right the virtual machine and select Manage Snapshot
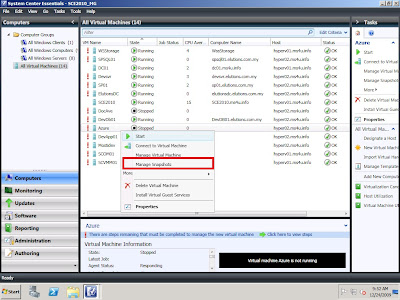
2. There are three (3) button available.
You can select "New" to create new snapshot, "Restore" to apply the snapshot and "Delete" to remove the snapshot.

3. If you select "New button", a new snapshot windows appear. Enter the snapshot name.

4. If you select "Restore", a pop up windows will appear to confirm the restoration process. Click "Yes" to restore the snapshot and Click "No" to abort the restoration.

5. If you select "Delete button", a pop up windows appear to confirm deletion process. Click "Yes" to confirm the deletion and click "No" to abort the deletion process.

Friday, January 1, 2010
Exam Preparation 71-693- Designing a management strategy
Here is the last section for Exam 71-693- Designing a management strategy
http://ms4u.lefora.com/2009/12/17/offer-exam-71-693-designing-a-management-strategy/
Enjoy!
http://ms4u.lefora.com/2009/12/17/offer-exam-71-693-designing-a-management-strategy/
Enjoy!
Exam Preparation 71-693 - Designing a Deployment Strategy
Happy New Year!
Here is the updated links for Exam 71-693 -Designing a deployment strategy
http://ms4u.lefora.com/2009/12/17/offer-71-693-designing-a-deployment-strategy/
Enjoy !
Here is the updated links for Exam 71-693 -Designing a deployment strategy
http://ms4u.lefora.com/2009/12/17/offer-71-693-designing-a-deployment-strategy/
Enjoy !
Subscribe to:
Posts (Atom)