Search This Blog

Wednesday, August 28, 2013

Sponsor : Microsoft Ukraine and StarWind Software Introduce a Unique Solution for Business Virtualization


[Date:- 28 August 2013]

Dear Ukraine reader,

You may want to check out this unique offer from Microsoft Ukraine and Starwind.  Click here to know more.

Link provided by our sponsor: Starwind Software.

Thursday, August 22, 2013

How Vulnerable Is Your Hyper-V Server?


image

This is the most common question that we always ask ? I’m not sure. Well, now I can easily get the answer, thanks to 5Nine who just released 5Nine Security and Scanner for Hyper-V FREE Beta. If you’re interested, feel free to

Download the 5nine Security for Hyper-V FREE!

A bit information about the product:-

  • It’s FREE and doesn't require any software licenses
  • Free Agentless/Host-Based Anti-Virus
    • Reduce capital expenditure by increasing VM density 15-30%
    • No anti-virus storms or crashed machines
    • Save network bandwidth
  • Free Hyper-V Virtual Firewall
    • Secure and Firewall VM's from the outside as well as from each other
  • Free Security and Compliance Scanner
    • Virtual Machines Firewall Protection Status Check
    • Extensive Free AV Check
    • Performance Check
    • IDS Status Check
    • Detailed Executive Report
    • Security Enhancement Recommendations

Let have a look on how vulnerable of our existing Hyper-V server.

Once installed, just double click the icon “5Nine Security and Compliance Scanner" and click Start Scan.

image

This process will take a while. Let take a break with a cup of coffee……

After a while…

Well, it look like the result is not as good as I’m expecting based on the summary screen.

image

To know more, click View Report.

image

We got 2 critical and 2 warnings health detected. Let look deep on the report.

Security section

My system don’t have VM firewall and IDS to protect the infrastructure. Sad smile

image

Performance section

Based on ratio, CPU performance is adequate but I’ve exhausted memory which I should probably request for an additional memory upgrade to support large workload running on Hyper-V. Smile

image

Antivirus section

No agentless anti-malware detected to protect our VM.

image

Hmm…It is time for us to consider security in order to protect our virtualization infrastructure.
Wednesday, August 21, 2013

Building Windows Azure Pack Into Your Data Center–Part 2


This post is part 2 of previous post. In our previous post, we have look on Administrator Portal. Today in this part, we are going to explore Tenant Portal.
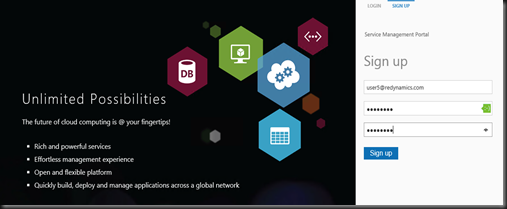
Let have a walkthrough on how tenant access to their portal. To start with, a new tenant will need to sign up first. Click on Sign Up and key in email address and password.
New tenant- Sign up
image
On the sign up page, make sure you enter a new tenant email address and correct password. The system will perform checking and make sure only the not exist email account can register and of coz with the correct password. An Administrator can configure the complexity of the password from the Admin Portal.
image
Depend on how you configure the account sign up. By default, after a tenant create their account, they will directly access to the portal. You as an administrator can configure the system to send an email and request the tenant to perform verification to make sure their email account is valid before allow them access to Tenant Portal.
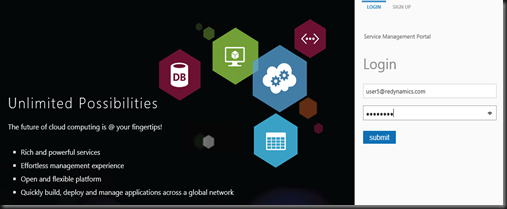
Once login in, if you’re a new user, the system will provide a 5 step wizard on how to navigate the system.
image
On navigation pane, it will not display anything except view Account info. Therefore a tenant need to subscribe a subscription plan or request an Administrator to assign a plan.
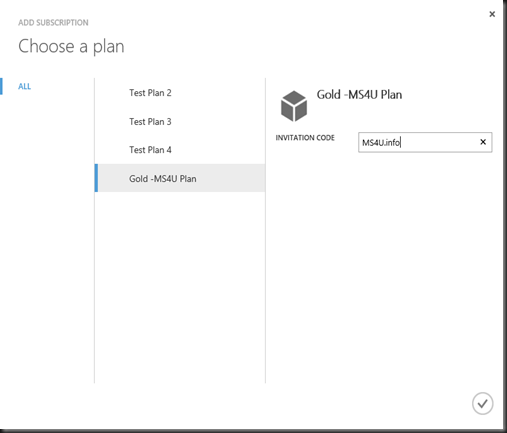
imageTo subscribe a plan, click on +NEW.  image , My Account and select Add Subscription.
image
A pop up appear and you can view Public Plan that has published by Admin. You can prevent other Tenant from subscribing a Plan by setting an “invitation code”. Only a valid code will be able to subscribe this Plan. Just key in the code or select other Plan which is open for public.
Plan by invitation code:-
image
Plan Without invitation code:
image
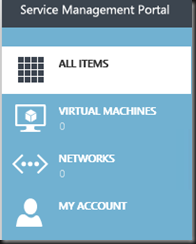
Once a plan has subscribed, VMM will create tenant account and configure your quota based on your subscription plan. Then your navigation pane will also display an additional services according to your plan.
image
Now let move on stuff that you can do on account. You can basically change your password after login it. Select your ID and click Change Password.
Change password:
image
Enter your old password and new password.
image
Besides that, if you’re one of the unhappy tenant then you can also delete your account.
Before I forget, one tenant can also subscribe multiple plan and add-on on the same account.
Create a Stand Alone VM
Are you ready to create your new VM? Just click +New , select Stand Alone VM and click Quick Create.
You need to enter VM name, select VM template and local administrator password. Once you click “Create VM Instance”, you just relax while enjoy your cup of coffee. At the back end, VMM will start to provision your VM.
image
Alright. While waiting for the VM to be provisioning, let me put down my pen. Stay tuned on our next post whereby we will explore more after VM creation by using Windows Azure Pack.
Post:-

Monday, August 19, 2013

Auto Failover VM In A Cluster When Network Disconnected


I’m not sure about you folk but I did saw this scenario happened in my customer environment who are running Windows Server 2008 R2 or Windows Server 2012 Hyper-V. When you’ve a network disconnection on the virtual switch, your VM will lose connection and client was unable to connect to the affected VM. Rest assure that our nightmare going to end soon. With Windows Server 2012 R2 (Preview), I’ve managed to locate this option. It is called “Protected network” and you can see it on VM Network | Advanced features | Protected Network.

By default, “protected network” option is enabled on the VM level. and when it’s detected a network disconnection, your VM (in the cluster ) will automatically failover to another node.

image

Do check it out!

Sunday, August 18, 2013

Building Windows Azure Pack Into Your Data Center–Part 1


Hi folks, finally I’m managed to setup functional Windows Azure Pack (WAP) into our data center with a few obstacles during preparation and configuration.  To get started, Windows Azure Pack is a collection of Windows Azure technologies available to customer. We love “Windows Azure” feel and look, therefore would like to bring it into your organization without subscribe to Windows Azure. Do I need to build myself? Well, that would involve a lot of manpower and resources to built. So why built your own. Microsoft is kind enough to come out with Windows Azure Pack for you to deploy in your organization the cool things is without an additional cost.
Images:- Current Windows Azure UI
image image
image
In order for you to deploy Windows Azure Pack, you ‘re require to have existing investment in Windows Server and System Center. The benefit of having Windows Azure Pack:-
a) Rich self service portal for your own organization
b) Multi tenant cloud
c) leverage on existing infrastructure (Windows Server and System Center)
d) Consistent with the public Windows Azure experience
image
Windows Azure Pack will integrate with Windows Server and System Center to provide:-
a) Management Portal for Administrator and Tenants
Administrator Portal provide a single console to configure and manage resource clouds, user accounts, tenant offers, quota, plan and pricing.
Default url:- https://azurepackportal:30091
Meanwhile Tenants Portal provide a console to provisioning, monitoring and management of services such as Web Sites, VM and Service Bus.
Default url :- https://azurepackportal:30081 (You can change this to meaningful url)
Today, let explore on how to use Windows Azure Pack portal to Virtual Machines services.
Administrator Portal – Create Hosting Plan
As an Administrator, you can start by configure Plan. You plan consists of resources, quota and offers to your tenants.
image
Follow the wizard, 3 easy steps:
Step 1: Give a meaningful name for your hosting plan
image
Step 2: Define your services for a hosting Plan. Well, let choose “Virtual Machine Clouds” as I would just use this Azure Pack for VM deployment.
image
Step 3: Select Add-on for the plan.
image
A Hosting Plan was successful created. By default, the plan is set to Private use. You can limit the plan by invitation, solely for certain individual group of user to use or open for Public.
image
Let look on the extra configuration for Hosting Plan:-
Dashboard – an overview view of tenant subscription and your plan services.
image
Click on panel to change access (Private, Public, decommisioning), clone a plan to create another similar plan, add new services and remove plan/services.
image
Plan configuration:-
Define which
a) VMM server to use
b) cloud that you would like the VM to deploy to
c) Set a quota to prevent people from exceeding their limit
image
d) Virtual network use during VM provisioning
e) Hardware Profiles – VM hardware specification
f) VM Templates
image
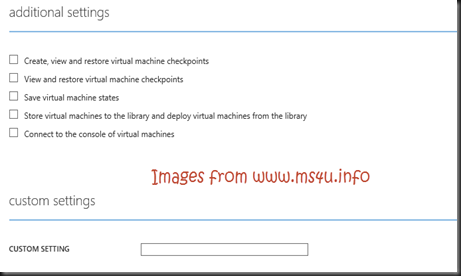
g) Additional settings that allow for your tenant and custom settings as well
image
Click SAVE.
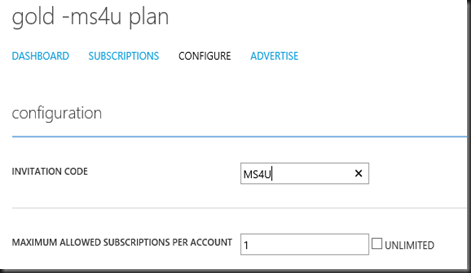
You can control user access to the plan by sending invitation code.
image
With Hosting Plan created, next task that administrator always will do is create an user account.
Administrator Portal – Create User Account
On the User Account, click NEW
image
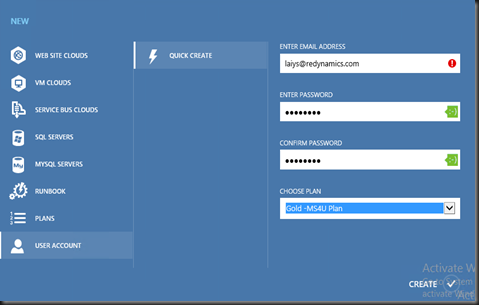
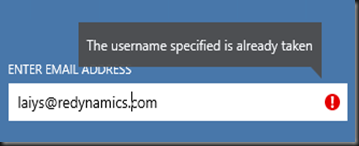
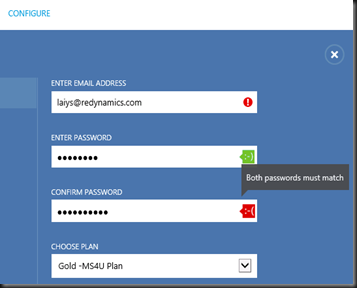
On the registration user account, enter email address, password and the hosting plan that this user subscribe to. The system has verification mechanism as well to verify is the user exist on the system.
Error (Red mark) – I have created my user account using redynamics ID.
image
Error –incorrect confirmation password with the sad icon.
image
So how do feel the Windows Azure Pack -Administrator Portal? For me, I greatly love the consistent Windows Azure UI experience.
I think that’s all for today. Stay tuned for our next article which is going to walkthrough on Tenant Portal.
Our next post is available, check out here:-

Friday, August 16, 2013

Launching : Veeam Backup and Replication v7


Hi folks,

Check out this image on Veeam Backup & Replication v7 Solution by the Numbers.


Interested on how powerful the solution? Well, you can now officially  download Veeam Backup & Replication v7.


Thursday, August 15, 2013

Software Defined Networking (SDN)


Software Defined Networking (SDN) a.k.a. Hyper-V Network Virtualization (HVN) on Windows Server 2012 Hyper-V extends the virtualization benefit by isolate virtual networks on a single host. It allow you to create virtual networks that run on top of the physical network.

Last year presentation during Windows Server 2012 launching event, I’ve talk about it as well. Check out here.

Check out this video:-

Today network team isolate the network by using VLAN but Vlan has a limitation to support up to 4096 VLAN ID. If you look at my scenario, I have Blue and Red VM Network. Both VMs are having the same IP address. So what happen if you’re having a same ip address? Well, you definitely will get conflict IP address error message.

VM Network diagram: (Our example is Blue001, Blue002, Red001, Red002)

Host1 VM Connectivity:-

image

Host 2 VM Connectivity:-

image

To avoid conflict IP address, we use Network virtualization to create multiple subnets. Every virtual subnet has it own virtual subnet ID and only VMs which is having the same subnet ID will not getting an ip address conflict.

VM Name Customer Address Virtual Subnet ID
Red001 10.0.1.100 1283442
Red002 10.0.1.101 1283442
Blue001 10.0.1.100 6878001
Blue002 10.0.1.101 6878001

Therefore, our VMs on the same virtual subnet ID can communicate each other.

Red001 –> Red002

Blue001 –> Blue002

Red

Where Software Define Networking is suitable to use?

  • When you have use up 4096 Vlan ID
  • Multi-tenant environment. Suitable for hoster environment
  • Isolation between two environment. Example:- Production VM and Development VM having the same IP subnet
  • Merger of two organization with having same IP subnet
  • Constraint to a single subnet
  • Anytime ( up to you if you’re interest to test this feature)

In my lab environment, I have created 2 VMs network and configure network virtualization using VMM 2012 R2 (Preview).

Here is some PowerShell that you can use to check SDN.

To get the policy entries for VMs in a virtual network, execute command Get-NetVirtualizationLookupRecord

imageimage

Get VM Mac Address using Powershell

Get-VM | Get-VMNetworkAdapter

image

image

When configure Hyper-V Network virtualization, there are two types of IP Address that you will using:

a) Provider Address (PA) – unique IP address assigned to each Hyper-V host that are routable across the physical network infrastructure.

b) Customer Address (CA) – unique IP address assigned to each VM that are participating on a virtualized network.

To get the provider address, execute command “Get-NetVirtualizationProviderAddress”. It will lists the provider address (PA) that configured in Windows Server 2012 Hyper-V Network Virtualization.

Host 1 Provider Address Result:-

image

Host 2 Provider Address Result:-

image

To get virtual network routes, execute command Get-NetVirtualizationCustomerRoute. Here you will be able to see that with network virtualization, it allow more than one virtual network to exist on the same physical network. Example:- Both network on subnet 10.0.1.0/24. Computer can exchange network traffic within a VM by using Customer Address (CA) within a virtual network.

image

Note:-

By default, when using VMM 2012 SP1 to configure Network virtualization the system will use NVGRE (Generic Routing Encapsulation).

For more information

Transforming your Datacenter with Software-Defined Networking (SDN): Part I
Transforming your Datacenter with Software-Defined Networking (SDN): Part II (Video)