Search This Blog

Tuesday, February 28, 2012

5Nine Cloud Backup for Hyper-V


Well, in today article we will explore on 5Nine Cloud Backup which just release to public.

The newly released 5nine Cloud Backup Monitor for Hyper-V is a part of 5nine Cloud Manager for Hyper-V that includes 5nine Cloud Backup, Monitor, Anti-Virus and Virtual Firewall for Hyper-V.

Product review: 5Nine Clod Backup ver 1.0

Came with two edition : commercial and FREE (limited to backup Virtual Machine at a time). I have downloaded the FREE edition and play around with it.

Well, the product is using image based backup: mean backup the whole VM and restore the entire VM. A straight forward product and easy to use.

Step:-

a) Add Hyper-V Host (either standalone or cluster Hyper-V)

b) Click on Backup  to create backup job and select Virtual Machine that you want to backup. Since it is FREE edition, then you just select a VM and select backup. For next VM, wait till the 1st VM has complete the backup.

c) For Restore, easy as well. Click the Restore button.

image

Simple yet powerful product to get virtual machine to backup. 

Download :- http://www.5nine.com/hyper-v-backup-disaster-recovery-free.aspx

Media Co-location in DPM 2012


Media co-location has exist since DPM 2010. It allow you to group multiple protection group when in the same retention range into the same tape. In DPM 2010, this feature only can achieve using command-line (rather than GUI) and user cannot specify which protection group to be part of the tape co-location. A lot of customer has raised concern and mentioned that it is not efficient in term of tape usage. Below screenshot is showing backup of VMM data and each tape store few MB. This has resulted wastage of tape resources.

image

DPM 2012 will allow administrators to co-locate multiple protection groups to one tape or set of tapes. In other words, tapes can be shared, which increases the products overall efficiency.

Click on the Optimize Usage in the ribbon

image

You can create a new Tape Co-location or add several protection group into 1 co-located tape.

image

Click Modify to modify existing sets and i have added VMM Backup and DPM Database as the one co-location sets.

image

When backup to tape occur, DPM will use the same shared tape. Here is the tape content when backup VMM data and DPM database into the tape:-

image

image

Tuesday, February 21, 2012

Encrypt Data to Tape in DPM 2012


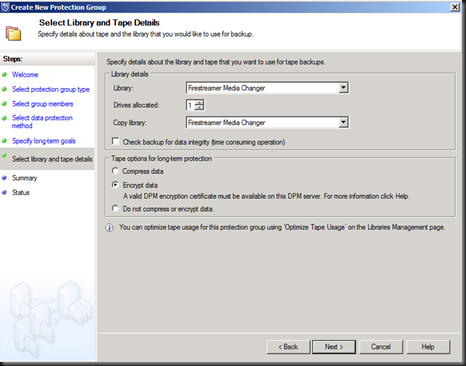
Today we are going to look into how to secure the data store into tape. To encrypt the data store in tape, you need to have a valid certificate. When configure tape select “Encrypt Data”

1

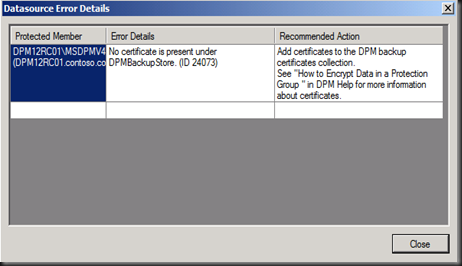
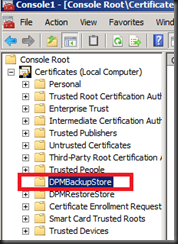
Below screenshot is the error message when you’re trying to backup data to tape. The job will fail because it did not detect certificate under DPMBackupStore Store under Certificate snap-in.

2

To resolve this issue, use any computer with IIS snap-in. Create a self signed certificate.

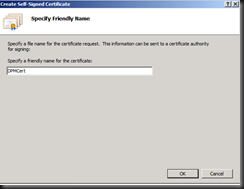
Below is the screenshot, on how to create a self signed certificate.

3

Provide a certificate name. Example: DPMCert

45

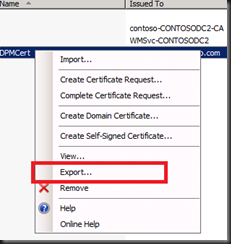
Once the self signed certificate has created, export the certificate and transfer to DPM 2012 Server.

6

In the DPM 2012 Server, open mmc snap-in and add Certificate snap-in. Import the certificate to DPMBackupStore Store. DPM will use these certificates to encrypt data. You can store multiple certificates there if you want DPM to create a key by using more than one certificate.

8

When your certificates expire, you must move them into the DPMRestoreStore folder in the Certificate Store. This ensures that you can recover the expired certificates from an encrypted tape by using a certificate that is no longer active.

After import the certificate, you can re-run the job to tape the tape and now you will be able to encrypt data to tape.

Article Posted:- Enable Connect Via RDP From VMM 2012


There was only one way to connect to a VM guest in VMM 2008 R2 with ‘Connect via Console’; VMM 2012 introduced an additional way to connect with ‘Connect via RDP’. There are steps to make this work however which are easy to implement for one VM though time consuming for multiple VMs. We’ve found a quick method to enable connecting via RDP on multiple VMs which we’d like to share with you.

If you’re interested, please check out my blog post @Altaro Hyper-V Blog. Click here

image

Friday, February 17, 2012

Microsoft Cloud Based Technologies Learning


Dear visitor,

Expand your existing skills and acquire new skills on Microsoft’s cloud technologies including: Microsoft Office 365, Microsoft Exchange Online, Windows Azure, Windows Intune, Microsoft Hyper-V Server, Microsoft SharePoint Online, Microsoft Dynamics CRM Online, Microsoft System Center 2012 and SQL Azure.

Microsoft has made available over 30 learning resources to enable you to explore these technologies, including: eBooks, E-learning clinics, short videos (a.k.a. learning snacks), and classroom training courses.

Many of these valuable resources are FREE. To name a few:

  • · Understanding Microsoft Virtualization Solutions (eBook)
  • · Introduction to SQL Server 2012 (eBook)
  • · Microsoft® Office 365: Connect and Collaborate Anywhere, Anytime (eBook)
  • · Introducing Hyper-V in Windows Server 2008 R2 (learning snack)
  • · SQL Server 2012: Cloud on Your Terms (learning snack)
  • · Introduction to Microsoft Windows Azure Platform (learning snack)

Microsoft’s cloud-based technologies are relevant to specific job roles. Start here

To understand more, check out the Microsoft Learning Cloud Brochure. Click here 

Thank you, and good luck!

Lai (Founder www.ms4u.info)

Wednesday, February 15, 2012

Replication using Veeam Backup and Replication 6 for Hyper-V Part 2


On previous post, we have covered about the replication configuration. Now let us continue Part 2 which focus on failover and fallback. Before that, let have a look when problem occur during replication.

Replication failed status when DR connection is down. (Click on Job | Select Replication | Right click and select Real-time statistic)

image

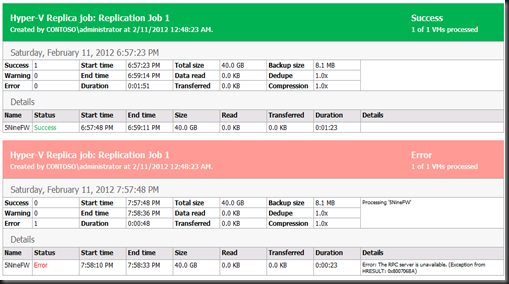
To get more detail about the replication issue, you can generate a HTML report. Failed job is displayed in pink colour. (Click on Job | Select Replication | Right click and select Report)

image

If replication fail, the system will perform retry on next schedule.

Below screenshot has specify to perform replication every 1 hour.

image

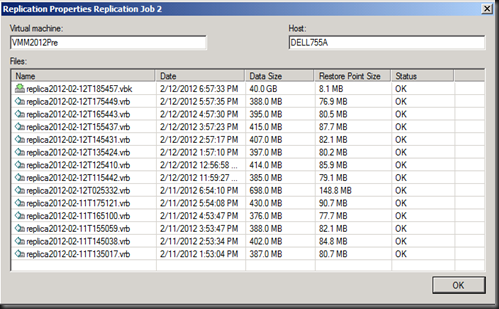
To view the result of each replication status:- (Click Replicas | Select the VM | Right click and select Properties)

image

Failover to DR Site

Now, let have a look on when we initiate failover.

Note:- Offline existing VM @Primary site before perform failover to avoid conflict.

Right click on the job and select Failover.

image

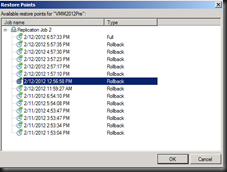
Select the VM recovery point that you want to failover

imageimage

Specify the reason to restore and proceed till last step to failover

image

Once complete, VM @ DR Site will boot up.

Fallback to Primary Site

Now let perform try fall back. Select the VM | Right click and select Fallback

image

Select the VM and click Next

image

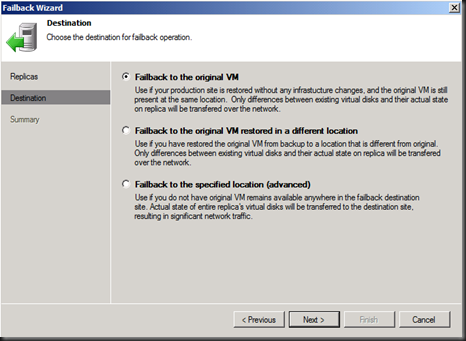
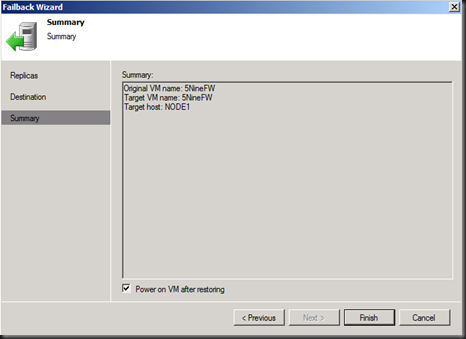
Choose the option for destination. You can fallback to the original VM or different location.

image

image

During failover or fallback, just monitor on the Hyper-V Manager snap-in and you can see the system create / delete snapshot for this operation.

Previous post:-

Saturday, February 11, 2012

Replication using Veeam Backup and Replication 6 For Hyper-V


image

Hi everyone, before any future product launching from Microsoft side, i took this opportunity to review our blog sponsor product. Last round, i’ve covered albout Altaro Hyper-V Backup V3. In this article i will cover about Veeam Backup and Replication 6 for Hyper-V. I’m interested on Replication feature therefore this article will talk about setting up replication by using 2 Hyper-V Host Server. From the configuration step below, we will explore on how to achieve replication using Veeam product.

Before we start, make sure you have download the software and get the free NFR license. To get it, please refer to  HYPER-V and SYSTEM CENTER- Free NFR License for Veeam. Install the product and in my scenario has used 2 Hyper V host server : Node1 and DELL755A to simulate the replication.

Configuration:-

1. First configure replication. Right click Replicas and select Replication.

image

2. On New Replication Job page, enter job name and select environment of your DR site. Options for your DR site:-

  • Low connection bandwidth (enable replica seeding)
  • Separate virtual network (enable network remapping)
  • Different IP addressing scheme (enable re-IP).

For more detail about the options, please refer to below screenshot.

image

I will proceed the configuration without specify the option for DR site.

3. On Virtual Machines page, select the VM that you would like to replicate.

image

4. On Destination page, i select “DELL755A” – my destination DR Hyper-V Server and select the path to store the replica VM.

image

5. On Job Settings, specify source proxy at the DR site and configure Replica setting such as VM suffix and retention policy. Click on Advanced to

image

6. On Advanced Settings, you can configure

a) Compression level (Low, Optimum,, Best,None)

b) Storage optimization (local, LAN or WAN target)

c) Notification settings (email, SNMP)

d) Hyper-V (change block and Hot Linux VM Backup without suspend VM)

e) Integrity check, etc

image image

imageimage

7.On Guest Processing, select if you want Veeam to detect application aware image processing to ensure transactional consistency.

image

8. On Schedule page, configure replication scheduling and automatic retry.

image

Additional page for “Option for DR Site”- refer to step 2”

1. Enable replica seeding. Allow you to get the initial replica from backup repository and re-map the replica VM.

image

2. Separate Virtual Network. Allow you to specify the source and target virtual switches.

image

3. Different IP Address scheme. Allow you to change VM IP address. This option is useful when DR site consist of different subnet and you would like to configure different IP Address. Specify the Source and Target IP for the VM.

image

@ DR Site Server. Replica VM is created with suffix _replica

image

Replication report:-

image

Full report in HTML format:-

image

On our next review, we will look on how to perform failover. Stay Tuned.

Next Post:- Part 2

Thursday, February 9, 2012

Time Synchronization Issue When Running Virtual Domain Controller


You probably having “time out of sync” when DC is running in Hyper-V environment and would like to try my method.

Some suggestion that you can try to resolve this issue:-

1. Uncheck “Time synchronization” from Integration Services on the DC VM.

image

2. Set aside 1 Physical Domain Controller which running PDC Roles.

3. If you would like to setup Virtual Domain Controller which running PDC Roles to sync time with external NTP time source.

I’m using External NTP time source from:- pool.ntp.org

a)To configure the PDC FSMO in the forest root domain with one or more time servers
w32tm /config /manualpeerlist:”pool.ntp.org”,0x1 /syncfromflags:manual

b)To update the “Windows Time Service” configuration
w32tm /config /update

c) To resync time with a source
w32tm /resync

1

2

View the result from registry .

  • HKEY_LOCAL_MACHINE\SYSTEM\CurrentControlSet\Services\W32Time\Parameters

image

Related post:-

Tuesday, February 7, 2012

Altaro Hyper-V Backup V3


Good news! Altaro Hyper-V Backup V3 has just released to public and in today post we are going to review about this product.

New improvement:-

  • Central Management console on CSV Cluster
  • Backup Mirroring & Drive Swapping.
  • Increased backup performance with Reverse Delta V2.
  • Schedule Groups
  • Live Backup of Linux VMs or Non Aware VSS Guest VM

To begin, install Altaro Hyper-V Backup V3 at Node 1 (Cluster Hyper-V ).

Download the installer (11 MB):- Click here

image

Central Management

The administrator can manage all VMs across all Nodes from a single console. This means that all backups, restores and configuration can be done from one centralized console.

In a cluster environment the VMs across all nodes will be backed up to a single backup target such as a USB drive, NAS, SAN etc.

When on a cluster, and a VM moves from one node to another, the new version 3 will detect this automatically and the VM will be backed up anyway – all without admin intervention

Let back to installation. The wizard detected that your Hyper-V host is running in the cluster. Therefore the first option that you should do is configure a Master Controller Node. Just install on 1st Node. Don’t worry. You can easily change another Node to become a master controller Node.

Click Next to begin.

image

Then, for other cluster node, select to install as Backup Agent and Click Next

image

Click “Install and Configure Agents” to deploy the Altaro agent.

image

Once complete, click on Altaro Hyper-V Backup shortcut from the Start Menu.

The program still simple. This is the 1st screenshot that you will see.

image

Some minor configuration and improvement:-

a) Select the Guest VM to backup. Just tick the VM.

b) Select a Backup Drive

Drive Swapping

You can configure Backup Drive or use Network UNC Path. New Improvement from here is you can enable and configure Multiple Backup Drive Swapping. The new Drive Swap functionality allows the customer to rotate backups drives on a daily basis. The drive swap works with USB, SATA and eSATA drives. These backup drives will be organised by a user defined priority and the active backup drive will be swapped accordingly.

This option only available when select Physical Backup Drive. No Drive Swapping when using UNC path.

image

Drive Mirroring

Another enhancement is configure Backup Drive Mirroring. Backup Drive Mirroring allow you to create redundant backup from existing backup drive. You can configure synchronization based on schedule or manual.

This option is not available if you enable Backup Drive Swapping. You can use Physical Drive or UNC Path.

image

c) Configure Backup Schedule

Group Scheduling

By default, 2 schedule group are created: Weekday, Weekend. You can create custom schedule as well. Once schedule is created, just drag and drop protected server into the schedule.

image

That’s how simple the backup configuration that you can configure in your environment. Let covered on others new improvement.

Reverse Delta V2.

With Reverse Delta V2 , the system can increase incremental backups at a minimum 300% faster.

When backing up over a network the new Reverse Delta V2 will automatically detect network connectivity issues and through a series of retries it will wait for the network to stabilize and will then continue the backup.

Live Backup of Linux VM or Non Aware VSS Guest VM

For the Linux VM, you can now backup the Linux VM or Non Aware VSS Guest VM without saving or resume the VM. Altaro Hyper-V Backup V3 will perform hot backup of the VM. This feature can be enabled from the VM advanced tab in the Altaro VM Settings Window.

image