Search This Blog

Thursday, July 26, 2012

Conversion Between Windows Server 2012 Installation Options


Today, I'm exploring the Windows Server 2012 installation options and let have a look on how easy to perform conversion. Before that, let look into the option in the current version.

In Windows Server 2008 R2 , we can choose between Server Core (Dark –DOS Mode) or GUI. But we CANNOT switch over between Core and GUI except perform a  full reinstallation of the operating system. So you got an options, security or ease of management? Well i will choose Server Core but some customer prefer GUI.

image

However in Windows Server 2012, we still can choose Server Core or GUI but now we can easily switch over between both Installation options without reinstall the entire operating system.

image

Let have a look on the configuration to switch installation options for future Hyper-V deployment.

From Server Core to Windows Server GUI

This options start by install Server Core, suitable for hardcore DOS fan. Then would like to make life easy to configure setting. Therefore GUI is an additional option and you can switch back to Server Core. To configure:-

1. Create a folder to mount WIM. Type mkdir C:\mountdir

2 Determine the index number for a server with GUI image. Type

dism /get-wiminfo /Wimfile: d:\sources\install.wim

image

3. Mount the WIM for Server DataCenter. So the Index is 4

dism /mount-wim /wimfile: d:\sources\install.wim /Index:4 /mountdir:c:\mountdir /readonly

image

4. Start powershell and execute

Install-WindowsFeature Server-Gui-Mgmt-Infra, Server-Gui-Shell –restart –source c:\mountdir\windows\winsxs

image

From Windows Server GUI to Server Core

Start install the OS on Windows Server GUI, configure Hyper-V Setting and configuration. Once complete, secure it by switch to Server Core. To configure:-

1. Type

Uninstall-WindowsFeature Server-GUI-Mgmt-Infra –restart

image

To Minimal Server Interface

New installation option but only can configure using Server Manager or Powershell. This options allow you to enjoy the benefit of Server Core and limited GUI option.

What is missing in Minimal Server Interface?

  • No desktop
  • No Start screen (Bye bye start menu)
  • No Windows Explorer
  • No Internet Explorer

So what’s management tool available in Minimal Server Interface?

  • Server Manager
  • MMC snap-ins
  • Subset of Control panel

To switch in Minimal Server Interface using Server manager:

1. Remove feature:- Server Graphical Shell.

image

To switch in Minimal Server Interface using Powershell:

Uninstall-WindowsFeature Server-Gui-Shell –remove

To switch from Minimal Server Interface/Server Core to GUI :

Install-Windowsfeature server-gui-shell

image

Snapshot of the table (taken from Technet) that i find useful to identify the component which is available :-

image

Related post that  i use to: refer-

Sunday, July 22, 2012

Configure Port ACL in Hyper-V


image 

In this article, we will look on how to configure Port ACL (Access Control List) in Hyper-V to provide additional security in the virtualization infrastructure. If you are familiar with Cisco switch, probably you know the function of  ACL. Both is similar and the purpose is to filter  ingress and egress traffic based on conditions specified in the ACL.

By default, when create a virtual network adapter there is no ACL on it.

Command to use on configure Port ACL:-

image

Scenario on my test environment:-

  • Only allow HR User (reside in subnet 192.168.88.0/24) to access HR Virtual machine (name: VM1).
  • Prevent Subnet 192.168.89.0/24 and 192.168.90.0/24 from accessing HR VM

image

Note:- above scenario is just one of the sample scenario.

To configure port ACL, you need to use Powershell. No GUI !

Description on how to to add Port ACL:-

Command to use: Add-VMNetworkAdapterACL

  • Specify the VM name to apply the ACL
  • Remote IP Address (Ipv4 or Ipv6) or Remote Mac Address
  • Direction – Inbound traffic, OutBound traffic, Both (Inbound & Outbound)
  • Action – Allow traffic, Deny traffic, Meter – to measure traffic
Add-VMNetworkAdapterACL –VMName VM1 –RemoteIPAddress 192.168.88.0/24 –Direction Both –Action Allow
Add-VMNetworkAdapterACL –VMName VM1 –RemoteIPAddress 192.168.89.0/24 –Direction Both –Action Deny
Add-VMNetworkAdapterACL –VMName VM1 –RemoteIPAddress 192.168.90.0/24 –Direction Both –Action Deny

image

To view the ACL result

Get-VMNetworkAdapterACL

image

To remove Port ACL (one ACL at a time):-

Command to use: Remove-VMNetworkAdapterACL

Remove-VMNetworkAdapterACL –VMName VM1 –RemoteIPAddress 192.168.88.0/24 –Direction Both –Action Allow
Remove-VMNetworkAdapterACL –VMName VM1 –RemoteIPAddress 192.168.89.0/24 –Direction Both –Action Deny
Remove-VMNetworkAdapterACL –VMName VM1 –RemoteIPAddress 192.168.90.0/24 –Direction Both –Action Deny

To remove entire Port ACL that apply to VM1:-

Get-VMNetworkAdapterACL VM1 | Remove-VMNetworkAdapterACL

Saturday, July 21, 2012

Update Management With VMM 2012


In the articles, we will talk about software update compliance for the infrastructure resources that host your private cloud.

image

Figure 1: Update Management with VMM 2012

Requirement to setup software update compliance:-

  • VMM 2012
  • SCCM 2007 or SCCM 2012
  • WSUS 3.0 SP2 (64 bits) –either root server or downstream server

You can patch the following infrastructure resources

  • Hyper-V Host and Cluster
  • VMM Library
  • WDS Server (PXE server)
  • VMM Management Server
  • WSUS Server

You CANNOT use VMM to patch the following resources:-

  • Virtual Machine
  • Vmware Infrastructure
  • Citrix Xen Infrastructure

To patch virtual machine, you need to use SCCM Server.

Update Management Activities

image

Step 1:-Add WSUS Server into VMM

Step 2:- Perform synchronization of Window Update Catalog from VMM Server.

Step 3:- Create a baseline which contain the windows update

Step 4:- Performance On Demand compliance Scan on the infrastructure resource from VMM console. VMM will report compliance or not compliance based on the baseline which you have create in Step 3.

Step 5:- For Non Compliance status, you can perform remediation or exemption. Please remember, not all update need to patch to the system and recommend to test before patch the infrastructure.

Update Remediate a Hyper-V Cluster

  • If live migrate VM is supported, then perform Live Migrate VMs before patch Host 1
  • Put Host 1 under maintenance mode.
  • Patch, Reboot and perform scanning to make sure the host 1 is compliant
  • Remove Host 1 from maintenance mode and put Host 2 under maintenance mode
  • Live Migrate VMs from Host 2 to Host 1
  • Patch, Reboot and perform scanning to make sure the host 2 is compliant
  • Remove Host 2 from maintenance mode
  • Move back original VM to respective Host
  • If live migration not enabled in the cluster, then VMs will put into Saved State.

Update Remediate a Stand-Alone Hyper-V Host

  • Patch the Host
  • You have the option to ‘Do not restart the server after remediation”

Let view the video on how do we use VMM 2012 to patch a Hyper-V Cluster

Related post:-

Saturday, July 14, 2012

Server Application Virtualization Sequencer Tip and Trick


Let begin our tip and trick on Server App-V.

You can use Server App-V to create a package with the following attribute

  • State persistent application
  • Microsoft Windows services such as IIS. Supported IIS version is IIS 6, IIS 7, IIS 7.5
  • Registry
  • Windows Services
  • COM/DCOM/COM+
  • WMI Provider
  • SSRS (SQL Services Reporting Services)
  • Text based Configuration Files
  • Local Users and Group

Unsupported by Server App-V

  • Drivers
  • Sharepoint
  • SQL Server

Tip #1:-

Use the same operating system that matches the operating system of the computer in which the application will be running.

Tip #2:-

  • Install any roles and features before sequence an application
  • Configure any roles and features before sequence an application

Tip #3:-

Must be in clean state. Revert to Initial State using Hyper-V Snapshot feature.

Tip #4:-

Store the primary virtual application package in virtual drive Q

Related Post:-

Tuesday, July 10, 2012

Change Linux Configuration in Hyper-V using Powershell


By default, VMM will deploy Linux VM template without OS Configuration and we are require to manually configure Linux VM setting such as computer name, ip address, dns, etc. Well, i’m not sure about you all but I'm NOT Linux expert. But luckly i found a way to achieve without going to Linux VM and make the necessary changes.

Before you read further, remember to create a Linux VM Termplate using VMM. Click here to learn on how to create Linux VM Template.

Once Linux VM has successful deployed, proceed to below step:-

0. Download SetLinuxVM Tool from http://www.setlinuxvm.com/. It is written in Powershell  by Yusuf Ozturk (MVP Powershell) and It's free.

1. First, you should allow signed Powershell scripts:

Set-ExecutionPolicy Allsigned
2. Extract file and move “SetLinuxVM” directory to “C:\Windows\System32\WindowsPowerShell\v1.0\Modules”. 

3. Remember to “Unblock” the Powershell script. To Unblock, select the powershell script, right click to select Properties and Click Unblock. Repeat this step for the entire powershell script.


3. Import as a module:
Import-Module SetLinuxVM


4.Change VM computer name to suse03.pcloud.local
set-linuxvm –vmname Suse02 –username root –Password password –Hostname suse04.pcloud.local


image


5. Change IP address
Set-LinuxVM -VMName "Suse02" Username "root" -Password "password" IPAddress "192.168.128.150" -SubnetMask "255.255.255.0" -GatewayAddress "192.168.128.150" -PrimaryDNSAddress "8.8.8.8"


image


Once you have execute the above command, you can view the process in Terminal.


image


Above is just an example which I've tested. For more setting, do visit Yusuf blog.


Nice tool to make my life simpler.

Presentation: Virtualization and System Management Using Microsoft Technology


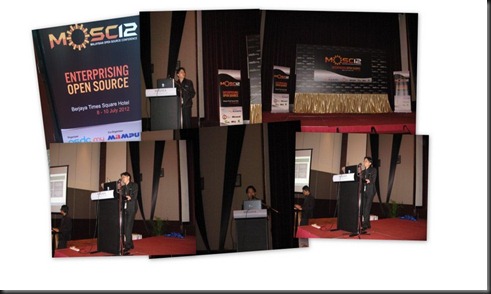
During MSC Malaysia Open Source Conference 2012 event, i have presented a session “Virtualization and System Management using Microsoft Technology” to 50 pax. In this session, i have shared about the free edition of Microsoft Hyper Server 2012 and Microsoft System Center to manage the virtualization infrastructure. Check on the slide and recording on how i use free edition of Microsoft Hyper-V Server 2012 to manage Linux Virtual Machine and use SetLinuxVM Tool to modify linux hostname and ip addressing. SetLinuxVM tool is created by Yusuf (MVP Powershell).

Event details:-

  • MSC Malaysia Open Source Conference 2012 Event
  • Date:- 10 July 2012
  • Time:- 9.30am
  • Venue: Berjaya Times Square Hotel, Level 14, Conference Room

Pic

Slide

Recording

MOSCEvents from Yoong Seng Lai on Vimeo.

Thursday, July 5, 2012

Presentation: The Next Generation of Microsoft Virtualization With Windows Server 2012


Today i have completed my session to 400 audience at Microsoft Cloud Summit (Singapore).After the event, we manage to capture a group photo who is participating in the event and take care of the booth.

image

Slide

Tuesday, July 3, 2012

Heading to Singapore


Today , I will be catching a flight to Singapore so i can attend Microsoft Cloud Summit (Singapore). Here is my schedule of the week:-

  • Date:- 3th July 2012
  • Time:- 7.30 – 10.00pm
  • Activity : Rehearsal and Demo Checking

Next day:-

  • Date :- 4th July 2012
  • Time: – 9.00 – 2 pm , 3.30 pm – 5.00 pm
  • Activity : Booth 10
  • Time:- 2.15 – 3.15pm
  • Activity : Speaking about “The New Generation of Microsoft Virtualization with Windows Server 2012”

Full event agenda: click here

If you are going to Cloud Summit and want to meet up with me – feel free to drop by at Booth 10.

See you @ Cloud Summit, Singapore.

Sunday, July 1, 2012

2012 -MVP Virtual Machine Renewed


Click “Send and Received” . You got Mail! ..

This will be my third year as a Virtual Machine MVP and I’m honoured to be a part of this group of brilliant people!

What is MVP? Check out here.

You can find my profile from here. It’s been a great year and I will continue to share the knowledge about Microsoft Virtualization to the community.

Congratulation to those who has renewed as well. Cheer!