Search This Blog

Wednesday, March 21, 2012

Convert Dynamic Disk Golden Image to Fixed Disk in Windows 8-Part 2

In Part 1, we have covered on using Convert-VHD Powershell command to convert multiple Dynamic Disk Golden Image to Fixed Disk. Thanks to Eric, he has highlighted a simpler way to achieve the same scenario with the combination of using Foreach-Object and Convert-VHD. Here is the command to share with the rest of people:

(1..4) | Foreach-Object { Convert-VHD -Path D:\VMMLibrary\Win2k8R2SP1ServerStandard.vhd -DestinationPath “E:\Test$_.vhd” -VHDFormat VHD -VHDType Fixed -ComputerName node1 }

Explanation

“(1..4)” creates an array 1,2,3,4. The Foreach-Object cmdlet will then run four times and “$_” will have the value of 1 on the first round, 2 on the second, and so on.

Today, I've learn something new and more coffee break time. :)

Previous post:-

Sunday, March 18, 2012

Hyper-V Replica in Windows 8 Beta –Part 1

Product:- Hyper-V in Windows 8 Beta

In this article, we are going to start looking into Hyper-V Replica and this post is focus on how to view the replica from GUI and Power shell perspective.

GUI is nice to view on each individual VM Replica. To identity each virtual machine which is participate in Hyper-V Replica , you need to refer to“Replication Health” column or click on each individual VM and select Replication tab.

Graphical User Interface (GUI)

View Hyper-V Replica in Replication Health or Replication Tab

image

image

To View Replication Health:- (Right click VM | Replication | View Replication Health)

image

Let move on to view in Powershell. Using Powershell is very handy and give you a better view which list the entire Hyper-V Replica VM. Just a single command will do.

Powershell

View virtual machine replication information :-

Get-VmReplication

image

View replication health using Powershell:-

Measure-VMReplication

image

And of course – there is much more to come!

Saturday, March 17, 2012

Create Multiple VM using PowerShell in Windows 8

In my previous post, i have discussed about how to convert golden image from dynamic disk to fixed disk for deployment use. Now let move on to use these virtual hard by creating virtual machine configuration.

Previous post:-

Let start to create Virtual machine using Powershell in Windows 8.

1. Modify previous script and enter additional command:

new-vm -Name Test1VM -MemoryStartupBytes 1024MB -VHDPath E:\Test1.vhd -SwitchName Production -ComputerName Node1
new-vm -Name Test2VM -MemoryStartupBytes 1024MB -VHDPath E:\Test2.vhd -SwitchName Production -ComputerName Node1
new-vm -Name Test3VM -MemoryStartupBytes 1024MB -VHDPath E:\Test3.vhd -SwitchName Production -ComputerName Node1
new-vm -Name Test4VM -MemoryStartupBytes 1024MB -VHDPath E:\Test4.vhd -SwitchName Production -ComputerName Node1

Command description:-

new-vm –name (virtual machine name) –MemoryStartupBytes (startup memory value) –VHDPath (location of converted VHD) –SwitchName (virtual switch name) –computername (hyper-v host name)

Explanation:-

Create 4 virtual machine name “Test1VM,Test2VM,Test3VM, Test4VM” with the startup memory set to 1GB, pointing to exiting VHD path and assign to virtual switch: Production

Result:-

image

That should do the trick. No multiple step in GUI and i found using Powershell is much easier and fun as well. :)

Friday, March 16, 2012

Convert Dynamic Disk Golden Image to Fixed Disk in Windows 8-Part 1

Do you ever use golden image to deploy virtual machine? I always create golden image and put into VMM Library so i can use VMM to deploy. Now let say, customer is using stand-alone Hyper-V host and do not have VMM and would like to create multiple VM. Then your only options is prepare a golden image and use Convert option in the Hyper-V Manager GUI. Creating a virtual machine is an easy task but it is tedious as you need to go through several step in order to reach to the end result. The pain start when you need to convert to multiple virtual hard disk for VM creation.

Therefore, i can came to an idea to use Powershell in Windows 8 to convert a golden image into 4 Virtual Hard disk and ready for deployment.

1. Create a powershell script and enter the following command

Convert-VHD -Path D:\VMMLibrary\Win2k8R2SP1ServerStandard.vhd -DestinationPath E:\Test1.vhd -VHDFormat VHD -VHDType Fixed -ComputerName node1
Convert-VHD -Path D:\VMMLibrary\Win2k8R2SP1ServerStandard.vhd -DestinationPath E:\Test2.vhd -VHDFormat VHD -VHDType Fixed -ComputerName node1
Convert-VHD -Path D:\VMMLibrary\Win2k8R2SP1ServerStandard.vhd -DestinationPath E:\Test3.vhd -VHDFormat VHD -VHDType Fixed -ComputerName node1
Convert-VHD -Path D:\VMMLibrary\Win2k8R2SP1ServerStandard.vhd -DestinationPath E:\Test4.vhd -VHDFormat VHD -VHDType Fixed -ComputerName node1

Above command allow me to create fixed virtual hard disk: Test1, Test2, Test3 and Test4 from golden image which i have prepare earlier.

Command format:-

Convert –VHD –Path (Source) –DestinationPath (Destination) VHD-VHDType (type) –Computername (Hyper-V Host name)

2. Just execute the powershell script and it will help you to convert dynamic disk:-golden image into 4 fixed virtual hard disk and ready to use in your deployment.

The script will convert one disk at a time without your extra effort. (Now i got more excuse to go for coffee break.)

Powershell result:-

image

I’m getting more excited to use Powershell to make my life as Virtualization Consultant easy .

Next post:-

Start Entire Virtual Machine Faster Using PowerShell in Windows 8

In today session, we are going to explore on how to start virtual machine. If you are using GUI, the task will be easy by just right click the virtual machine and select Start. Well, how about start 8 Virtual machines? That will involved 16 steps (Right click | Start).

Below is the screenshot of my 8 virtual machines and i would like to start them with just a single command.

image

Before you read further, let me give you 1 minute to think about the answer.

(1 minute has passed)…..please refer to below answer

Use Powershell and execute below command

start-vm fab*

The above command will trigger to start the virtual machine with the name begin with “fab” on the first 3 character. You can view the progress of starting the virtual machine and restoring of the VM from the Saved State.

image

Thursday, March 15, 2012

View Dynamic Memory in Windows 8

This is my 1st blog since Windows 8 Beta has just released to public. Have you try to install Windows 8 Server Beta in your test environment?

Well, i just reformat the lab machine and install with Windows 8 Server Beta, create few VMs and running System Center VMM 2012 SP1 CTP and DPM 2012 SP1 CTP. As usual before use VMM to manage my virtualization environment, i will need to use Hyper-V Manager snap-in.Did you realize something different when manage a VMs?

Well, on the front page, you no longer can view Dynamic Memory status ( startup memory, min memory, max memory, memory status) on the screen. Where is the Dynamic Memory?

New UI

image

Old UI

Here is the screenshot of previous UI just to refresh everyone about what i’m talking about.

image

This is the trick to view the result of dynamic memory

On the new UI, in order for you to view the same result, you need to select each individual VM. On the bottom, select Memory tab

image

How about view Dynamic Memory for entire Virtual Machine in the Hyper-V Host? Well, in order to do that, you need to use Powershell.

In Windows 8, when you execute Hyper-V command, it will automatically import-Hyper-V Module for you when you’re 1st time using it.

C:\ get-vm

Result:-

image

From Powershell, you will be able to get the same result as old UI. Cool right!

Tuesday, March 13, 2012

Incorporating Chargeback In Private Cloud

Quite a long time i did not blog due to busy with work. Well, not to disappoint visitor and keep blogging, here is the slide which i have presented to Regional Microsoft Boot Camp – Week 3.

Private Cloud has kick in and moving fast. Next question is “How do we provide billing and charge $$$ in virtualization environment?”

In today session, i have presented to 40 pax about the overview of Vkernel vOps which focuses on performance monitoring, capacity planning, optimizing resources, reporting and chargeback capabilities. Below is the slide for your perusal..enjoy

Thursday, March 1, 2012

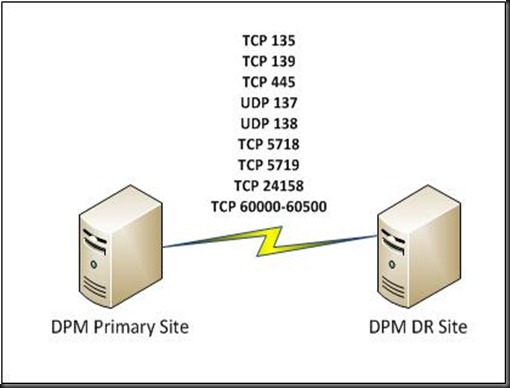
Site to Site DPM 2012 Replication Firewall Ports


Guy, anyone doing site to site DPM replication. Well, i have been playing around it since DPM 2010. Now i am testing Site to Site Replication using DPM 2012 and this round i’m not talking about step by step configuration. We will focus on the common question especially on firewall that exist in Site A and Site B. You are require to open certain ports in order for the replication to work.

Now, Microsoft Technet provide a good article on ports that you need to open in order for communication between DPM Server, Domain Controller, DPM Remote SQL Server and protected server. You can check the firewall port from here:- http://technet.microsoft.com/en-us/library/ff399341.aspx

One of the concern is the WMI and RPC dynamic port number which the range from TCP 1024 through 65535. So most security team will not allow you to open huge range of port number between site A and site B. Therefore below is the step by step that you can follow to configure fixed WMI port and set range of dynamic RPC port.

1. Configure WMI to use Fixed Port – TCP/24158

a) Open command prompt and type the following command

winmgmt -standalonehost
net stop "Windows Management Instrumentation"
net start "Windows Management Instrumentation"
netsh firewall add portopening TCP 24158 WMIFixedPort

To verify, open the Component Services from Administrative Tools. Expand My Computer | DCOM Config | Right click Windows Management Instrumentation and select EndPoint Tab. Select Connection oriented TCP/IP and select Properties

image

2. Configure Dynamic RPC Port to a specific range. For example: 60000 – 60500.

a) Open registry using the command regedt32. (must. Don’t use regedit)

b) Create the following Key Value under

HKEY_LOCAL_MACHINE\Software\Microsoft\Rpc\Internet\

c) Create Key Data Type

Ports REG_MULTI_SZ
PortsInternetAvailable REG_SZ
UseInternetPorts REG_SZ

Example:-

Ports: REG_MULTI_SZ: 60000-60500

PortsInternetAvailable: REG_SZ: Y

UseInternetPorts: REG_SZ: Y

image

d) Reboot the both the DPM server

3. Configure physical firewall between Site A and Site B.

Example:-

image

SitetoSite

That’s all for now. Hope this article is useful for those who are planning to setup site to site replication using DPM 2012.