[18 Feb 2011]
On Guest VM running Windows Server 2008 R2-Standard/Web Edition, you need to install SP1 RTM instead of just update the Integration Services Component.
[27 Oct 2010]
Has you try SP1 RC in non production environment ? By now, you should have try on Windows Server 2008 Standard or Web Edition guest virtual machine.
But somehow it is not working as intended. Well, don't worry. For those guest virtual machine running Windows Server 2008 Standard or Web Edition, you need to install a hotfix. To get this hotfix, please go to http://support.microsoft.com/kb/2230887.
All you need to do is
a) Request for a hotfix
b) Install the hotfix on the guest VM running Windows Server 2008 Standard Edition or Web Edition.
c) Install Integration Component
d) Configure Dynamic Memory
[Update: 29 Oct 2010]
This only occur on this edition of operating system. One last reminder is the guest VM running Windows Server 2008 must install with at least SP2.
Meanwhile, no patch or hotfix is require for Windows Server 2003 Standard Edition or Web Edition. All you need to do is update the Integration Services Component.
On Guest VM running Windows Server 2008 R2, you need to install SP1 RC instead of update the Integration Services Component.
Good Luck on your testing.

Friday, October 29, 2010
Thursday, October 28, 2010
What's Memory Status in Dynamic Memory?
Memory status show how much of the buffer amount specified for the virtual machine is available to the virtual machine at this time. Status is reported as one of the following:-

OK - indicated that there is enough physical memory available to give the virtual machine the full amount of memory buffer.
Low - indicated that the current amount of memory assigned to the virtual machine as a buffer is lower than amount that Hyper V determines should be available as a buffer.
Warning - This indicated that there is not enough physical memory available to assign any memory buffer to the virtual machine.
Wednesday, October 27, 2010
Hyper V Manager snap-in Changes in SP1 RC
Here is the changes on the Hyper V Manager snap-in when you've installed RC.
a) Beta version GUI
You will see additional column called "Memory Available".

b) RC version GUI

Compare both GUI and you will notice that in RC,
a) "Current Memory" has renamed to "Assigned Memory". It indicated the total memory currently allocated to virtual machine out of the pooled physical memory on the host.
b) Memory Demand Column added. It indicated how much memory the virtual machine needs at this time to meet the requirements of the active processes running in the virtual machine. This amount is equal to the total committed memory within the VM.
c) Memory Status Column added. Rather than seeing positive and negative value in percentage (Memory Available), product group has changed the status to Word.
I will discuss more detail on Memory Status in another post.
a) Beta version GUI
You will see additional column called "Memory Available".

b) RC version GUI
Compare both GUI and you will notice that in RC,
a) "Current Memory" has renamed to "Assigned Memory". It indicated the total memory currently allocated to virtual machine out of the pooled physical memory on the host.
b) Memory Demand Column added. It indicated how much memory the virtual machine needs at this time to meet the requirements of the active processes running in the virtual machine. This amount is equal to the total committed memory within the VM.
c) Memory Status Column added. Rather than seeing positive and negative value in percentage (Memory Available), product group has changed the status to Word.
I will discuss more detail on Memory Status in another post.
Dynamic Memory Settings- Beta vs Release Candidate (RC)
Now, RC has released. It is time to disclose some information about the different from Beta vs RC on Dynamic Memory.
Here is the interface
a) Setting of Memory on Beta Version

b) Setting of Memory on RC

Do you notice the different ?
Yes, correct. In RC, the product team has changed the GUI on Memory Setting. Based on feedback receive from customer, the product group has changed the Memory Buffer to Text Box rather than Slider bar.

In Memory Buffer, the default value is 20%. You can enter value from 5 - 2000%.
Meanwhile, Memory priority name has renamed to Memory Weight.
Memory Buffer and Memory Weight setting can change while Virtual Machine is running.
I will update more as soon as possible. Stay Tune on next post.
Windows Server 2008 R2 SP1 RC has released
Good News!
Windows 7 and Windows Server 2008 R2 SP1 Release Candidate (RC) has released. To download, pls go to:- http://technet.microsoft.com/en-my/evalcenter/ff183870(en-us).aspx
As i have explained previously, the SP1 has 2 new features :
a) Dynamic Memory - With Dynamic Memory, IT administrators are able to pool available memory on a physical host and then dynamically dole that memory out to virtual machines running on the host, based on current workload needs.
b) RemoteFX - with RemoteFX end users can now access virtual machines on a wide variety of target devices and still get a rich graphics experience with server-side graphics processing.
More question about SP1 RC, please refer to FAQ.
In order to download and install the Windows 7 and Windows Server 2008 R2 SP1 Release Candidate you must currently have a Release to Manufacturing (RTM) version of Windows 7 or Windows Server 2008 R2 already installed.
If you have previously installed the Windows 7 and Windows Server 2008 R2 SP1 Beta on your machine, you must uninstall the beta before installing the Release Candidate.
Warning:- It's still RC ! Please try in non production environment.
Will post more detail, once i have finish download SP1 RC. Stay tune for more update...
Wednesday, October 20, 2010
Change VMM SQL Express With SQL Standard
We always start to install System Center Virtual Machine Manager (VMM) with SQL Express. One day, you will realise that SQL Express can't cope when you have added more Hyper V Host and Virtual Machine. By default SQL Express database size is limited to 4GB.
Then it's the time to replace SQL Express with SQL Server Standard Edition. The process is quite simple and here is the step that you should take:
1. Uninstall VMM Server. Make sure you select "Retain data" to maintain the VMM database.
2. Uninstall SQL Express 2005 component.
3. Install SQL Server 2008 Standard Edition and Service Pack.
4. Copy VirtualManagerDB and VirtualManagerDB_log from C:\Program Files(x86)\Microsoft SQL Server\MSSQL.1\MSSQL\Data. to C:\Program Files\Microsoft SQL Server\MSSQL10.MSSQLServer\MSSQL\Data.
5. Use SQL Server Management Studio to Attach the database.
6. Install VMM Server Component and use existing database.
7. Once complete the installation, verify that everything is intact.
So far, Host refresh, Virtual Machine management, VMM Library, Integration with SCOM, etc is working without any problem.
[Updated: 21 Oct 2010]
By default, VMM 2008 R2 came with SQL Server 2005 Express Edition with SP3.The default limit is 4GB.
You can follow the above step 1-7 to migrate to SQL Server 2008 R2 Express edition. This will allow you to have 10GB database limit.I have tested this scenario and it is working like a charm.
Simulation:- Virtualization Assessment using MAP 5
Hi, i have created a simulator especially to ms4u blog visitor.
In this simulation, you will learn to use Microsoft Assessment and Planning Toolkit 5 (MAP)
Note:-
Simulations will require .NET Framework 3.5 & Microsoft Silverlight to run on client machine.
Please click on Full screen icon to start the simulation.
In this simulation, you will learn to use Microsoft Assessment and Planning Toolkit 5 (MAP)
Note:-
Simulations will require .NET Framework 3.5 & Microsoft Silverlight to run on client machine.
Please click on Full screen icon to start the simulation.
Saturday, October 16, 2010
MVUG Webcast Slide:- From Zero to Hero on Hyper V R2- Part 2
MVUG Webcast Slide:- From Zero to Hero on Hyper V R2- Part 2
Live Meeting Session recording and demo can download by clicking below picture:View more presentations from Lai Yoong Seng.
Wednesday, October 13, 2010
Citrix XenDesktop 5 with Hyper V R2
For the pass few days, i have been busy attending training. Guess what?
 It's Citrix XenDesktop 5 which announced at Citrix Synergy 2010 Berlin (last week) which will ship by the end of the year 2010. Among several selected people, we had been train to use the latest Citrix. Since it is not yet release as production, i would not share the step by step instruction. However a high overview of the class setup during the training.
Here is our setup environment:-
 A machine installed with Hyper V R2 with the following Virtual Machine:-
a) Active Directory
b) VMM 2008 R2
c) Citrix XenDesktop 5 (DDC)
d) Win7Base (as master image)
e) Citrix XenApp
The entire environment is in domain environment and a DHCP is setup inside the Active Directory. Meanwhile, Citrix deployment is using Quick Deploy.
Backend infrastructure
Using Active Directory, Microsoft Hyper V R2 and VMM 2008 R2.
DDC VM
If you're familar with XenDesktop 4, supported operating system for DDC is Windows Server 2003. With XenDesktop 5, DDC can install in Windows Server 2008 or 2008 R2.
Quick Deploy is suitable in small environment and the entire Citrix component is installed into DDC VM. For those familar with Citrix XenDesktop 4, you will find the installation of Citrix XenDesktop 5 is easy. During the installation, Xendesktop Controller, Web Access, Desktop Studio, Desktop Director and License Server is installed.
You need to install VMM Administrator Console into this VM as well before establish a connection.
The following is setting that you to perform:-
a) Set Site Name
b) Establish Connection to VMM
c) Specify VM storage location.
d) Select Win7Base image
e) Configure pool image.
Win7Base VM
On the Win7Base VM, VDA agent is installed. Once done, offline the VM.
DDC will use VMM to create snapshot and multiple pool images.
There's a redesigned & brand-new administrative console called "Desktop Studio," which is where administrator will build, test, deploy, roll back images, create assignment, create policy, etc.
Lastly, not to forget a brand new web based helpdesk console called "Desktop Director". Now, you can delegate different roles to the user based on management tasks. These roles are designed to fit with the typical IT structure in an enterprise. For example, a user can be granted Read Only access to the XenDesktop site and use the Desktop Director at the Help Desk.
XenApp VM
Besides than Citrix XenApp, you need to install RDS Session Host. XenApp allow you to publish application into Citrix Web Access and inside the VM. The concept is similar as RD Session Host and RD Web Access.
To access the VDI and XenApp application, you can use Web browser.The web interface has changed to white background.
As a conclusion, a lot of cool stuff in Citrix XenDesktop 5 and XenApp during our lab environment. Hope to share more but it's still too soon as currently it is in beta stage.
To learn more about Citrix XenDesktop 5, feel free to visit http://community.citrix.com/display/ocb/2010/10/06/FREE+Citrix+XenDesktop+5+training+now+available%21

Here is our setup environment:-

a) Active Directory
b) VMM 2008 R2
c) Citrix XenDesktop 5 (DDC)
d) Win7Base (as master image)
e) Citrix XenApp
The entire environment is in domain environment and a DHCP is setup inside the Active Directory. Meanwhile, Citrix deployment is using Quick Deploy.
Backend infrastructure
Using Active Directory, Microsoft Hyper V R2 and VMM 2008 R2.
DDC VM
If you're familar with XenDesktop 4, supported operating system for DDC is Windows Server 2003. With XenDesktop 5, DDC can install in Windows Server 2008 or 2008 R2.
Quick Deploy is suitable in small environment and the entire Citrix component is installed into DDC VM. For those familar with Citrix XenDesktop 4, you will find the installation of Citrix XenDesktop 5 is easy. During the installation, Xendesktop Controller, Web Access, Desktop Studio, Desktop Director and License Server is installed.
You need to install VMM Administrator Console into this VM as well before establish a connection.
The following is setting that you to perform:-
a) Set Site Name
b) Establish Connection to VMM
c) Specify VM storage location.
d) Select Win7Base image
e) Configure pool image.
Win7Base VM
On the Win7Base VM, VDA agent is installed. Once done, offline the VM.
DDC will use VMM to create snapshot and multiple pool images.
There's a redesigned & brand-new administrative console called "Desktop Studio," which is where administrator will build, test, deploy, roll back images, create assignment, create policy, etc.
Lastly, not to forget a brand new web based helpdesk console called "Desktop Director". Now, you can delegate different roles to the user based on management tasks. These roles are designed to fit with the typical IT structure in an enterprise. For example, a user can be granted Read Only access to the XenDesktop site and use the Desktop Director at the Help Desk.
XenApp VM
Besides than Citrix XenApp, you need to install RDS Session Host. XenApp allow you to publish application into Citrix Web Access and inside the VM. The concept is similar as RD Session Host and RD Web Access.
To access the VDI and XenApp application, you can use Web browser.The web interface has changed to white background.
As a conclusion, a lot of cool stuff in Citrix XenDesktop 5 and XenApp during our lab environment. Hope to share more but it's still too soon as currently it is in beta stage.
To learn more about Citrix XenDesktop 5, feel free to visit http://community.citrix.com/display/ocb/2010/10/06/FREE+Citrix+XenDesktop+5+training+now+available%21
Tuesday, October 12, 2010
MVUG Webcast- From Zero to Hero on Hyper-V R2 Part 2

Time:- Saturday, October 16 · 5:00pm - 6:30pm
GMT + 8 , Malaysia Time
Asia/ Kuala Lumpur
Time conversion:- http://www.timezoneconverter.com/cgi-bin/tzc.tzc
From Zero to Hero on Hyper-V R2 part 2 - 75 minutes
Continue from 1st part. The second part, allows us to focus on installation and configuration. You will learn some tip and trick on setting up Base Image, Hyper V Server and Server Core. This walk-through will get you head start on using Hyper V before we move deep into Virtualization.
Live Meeting URL:
https://www.livemeeting.com/cc/mvp/join?id=WHH3CJ&role=attend&pw=tT%24%22Bq%7C7Z
Meeting ID: WHH3CJ
Attendee Entry Code: tT$"Bq7Z
First Time Users:
To save time before the meeting, check your system to make sure it is ready to use Microsoft Office Live Meeting
Check your system:-http://go.microsoft.com/fwlink/?LinkId=90703
Troubleshooting
Unable to join the meeting? Follow these steps: Copy this address and paste it into your web browser: https://www.livemeeting.com/cc/mvp/join Copy and paste the required information:
Meeting ID: WHH3CJ
Entry Code: 7,_sfC&=P
Location: https://www.livemeeting.com/cc/mvp
Reserve a seat either attend online or view the recording later. To reserve a seat, click here
Thank you
Thursday, October 7, 2010
Changing iSCSI Shared Storage IP Address After Setup Failover Cluster
Well, today i took a risk during a deployment. Here is how the story begin.
Task performed:-Setup Failover Cluster on 4 nodes with iSCSI Shared Storage.
Everything work fine but then suddenly need to change iSCSI Shared Storage Ip Address and on different subnet. Gosh !
Now the question is
1.Should i remove High Availability Virtual Machine (HAVM)?
2.Should i destroy the cluster?
3. Should i format the LUN during setup again Failover Cluster?
To be on safe side, here is what i do:
1. Shutdown the entire HAVM
2. Use Export feature to backup the Virtual Machine from the iSCSI Shared Storage and store in Physical Host.
3. Disconnect session and remove old iSCSI Target ip address
4. Change the iSCSI Shared Storage IP Address
5. Put the new iSCSI Target ip address and reconnect the LUN.
6. Connect to Failover Cluster Manager and reconnect the cluster.
7. Online the Disk from Failover Cluster Manager.
8. Restart the node to verify the configuration.
Guess what?
Without destroy the cluster everything work just fine. Look like no chance to import the Virtual machine.
At least i took a precaution in case any failure.
Wednesday, October 6, 2010
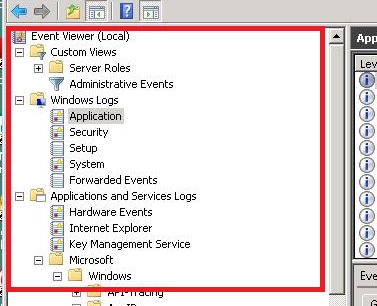
Hyper V Event Logs
This information is not new and you may not realise about it. But it come to very handy when problem occur on Hyper V Host.
Once you have install Hyper V Role, you will have additional 10 Event Logs. Check out Custom View > Server Roles > Hyper V.

To explore further, navigate to Applications and Services Log > Microsoft > Windows > Look for Hyper V XXX

Continue expand further to check out 10 Hyper V Event Viewer.

Thanks to Ben, (Original source), here is more detail on each Event Viewer.
Hyper-V-Config
This log contains events related to virtual machine Configuration, such as missing VM configuration files.
Hyper-V-High-Availability
This log is used for events related to Highly Available virtual machines utilizing Windows Server 2008 Clustering. These events are also replicated to the System log for gathering via Failover Manager.
Hyper-V-Hypervisor
This log is used by the Hypervisor to record partition creation and deletions.
Hyper-V-Image-Management-Service
This log records VHD creations, Image Management Service start events, as well as any action taken with the Edit Disk wizard.
Hyper-V-Integration
This log is used to record problems associated with the state of Integration Services in Child Partitions.
Hyper-V-Network
This log is used to capture the state of virtual networks in the Parent Partition, such as virtual network creation, deletion, or switch port connection.
Hyper-V-SynthNic
This log records events related to synthetic network adapters in Child Partitions. For example, if a virtual machine fails to start due to a missing virtual network, the event will be logged here.
Hyper-V-SynthStor
This log records events related to synthetic SCSI adapters in Child Partitions.
Hyper-V-VMMS
This log is one of the most commonly used logs for Hyper-V. This contains events related to snapshot merges, Import/Export, the Virtualization WMI Provider, and the state of the virtual machine management service.
Hyper-V-Worker
This log is also critical in that it contains the state of virtual machines. Events related to Starting/Stopping virtual machines, taking snapshots, as well as the state of emulated and synthetic devices will be logged here.
Hope this give you a first step to assist you further on identify problem.
Once you have install Hyper V Role, you will have additional 10 Event Logs. Check out Custom View > Server Roles > Hyper V.

To explore further, navigate to Applications and Services Log > Microsoft > Windows > Look for Hyper V XXX
Continue expand further to check out 10 Hyper V Event Viewer.

Thanks to Ben, (Original source), here is more detail on each Event Viewer.
Hyper-V-Config
This log contains events related to virtual machine Configuration, such as missing VM configuration files.
Hyper-V-High-Availability
This log is used for events related to Highly Available virtual machines utilizing Windows Server 2008 Clustering. These events are also replicated to the System log for gathering via Failover Manager.
Hyper-V-Hypervisor
This log is used by the Hypervisor to record partition creation and deletions.
Hyper-V-Image-Management-Service
This log records VHD creations, Image Management Service start events, as well as any action taken with the Edit Disk wizard.
Hyper-V-Integration
This log is used to record problems associated with the state of Integration Services in Child Partitions.
Hyper-V-Network
This log is used to capture the state of virtual networks in the Parent Partition, such as virtual network creation, deletion, or switch port connection.
Hyper-V-SynthNic
This log records events related to synthetic network adapters in Child Partitions. For example, if a virtual machine fails to start due to a missing virtual network, the event will be logged here.
Hyper-V-SynthStor
This log records events related to synthetic SCSI adapters in Child Partitions.
Hyper-V-VMMS
This log is one of the most commonly used logs for Hyper-V. This contains events related to snapshot merges, Import/Export, the Virtualization WMI Provider, and the state of the virtual machine management service.
Hyper-V-Worker
This log is also critical in that it contains the state of virtual machines. Events related to Starting/Stopping virtual machines, taking snapshots, as well as the state of emulated and synthetic devices will be logged here.
Hope this give you a first step to assist you further on identify problem.
Tuesday, October 5, 2010
Part 9 - Building VDI using Remote Desktop Services (RDS)
Update on the link from previous articles:-
Part 1: Overview and Initial Configuration
Part 2: Install RD Roles
Part 3: Guest VM Configuration
Part 4: RD Session Host Configuration
Part 5: RD Connection Broker
Part 6: PersonalVirtual Desktop (Static)
Part 7: Virtual Desktop Pool (Dynamic)
Part 8: RD Web Access Configuration
Here is Part 9 of Building VDI using Remote Desktop Services (RDS) which will focus on configuring Guest VM which running on Windows XP. If you refer to Part 3, i'm focused on configure for Windows 7. Now how about Windows XP?
After the XP virtual machines are installed and configured for the ms4u.info domain, you must configure them to work with Remote Desktop Services. The following steps must be configured on each virtual machine:
Task 1: Enable Remote Desktop.
1.Click Start, click Control Panel, and then click Performance and Maintenance
2.Click System
3.Click the Remote tab, select the Allow users to connect remotely to this computer check box, and then click OK
Task 2: Windows Firewall set up to allow exceptions
1.In the Control Panel, click Security Center
2.Under Manage security settings for, click Windows Firewall
3.Make sure the Don't allow exceptions check box is not selected.
4.Click the Exceptions tab, and verify that the Remote Desktop check box is selected.
5.Click OK, and then close the Windows Security Center window.
Your host computer is now set up to allow remote access.
Task 3: Execute Script.
1. Copy the script XPVDI-Client.vbs from http://cid-847c7d34b429ad95.skydrive.live.com/redir.aspx?resid=847C7D34B429AD95!214 and execute inside the XP Virtual Machine.
Task 4- Enable Rollback on a virtual machine
Once you've complete all the configuration, you need to enable rollback. This allow VM to revert to original state once the user has log off. No data is saved into the VM. Please do not save your data inside the VM.
1. Open Hyper-V Manager. To open Hyper-V Manager, click Start, point to Administrative Tools, and then click Hyper-V Manager.
2. Under Virtual Machines, right-click VDI01-WinXP.ms4u.info, and then click Snapshot.
3. Under Snapshots, right-click VDI01-WinXP.ms4u.info, and then click Rename.
4. Type RDV_Rollback and then press ENTER. (Must use the exact snapshot name)
5.Cose Hyper-V Manager.
Task 5 - Verify Remote Desktop
1. Use your client computer and Open Remote desktop connection. Click Start , on the search program and files , enter "mstsc" and press Enter
2. Key in "VDI01-WinXP" (XP VM Computer name)and click Connect
3. Provide security authentication by enter username: -ms4u\vdiuser1 and the password is P@ssw0rd.
4. Click Ok
5. Make sure you can log on to the VM.
Click here for Part 10:- Building VDI using Remote Desktop Services (RDS)
Sunday, October 3, 2010
Quick Storage Migration (QSM) FAQ
Not long ago, i've talked about QSM. If you've missed it, please refer to http://www.ms4u.info/2010/01/quick-storage-migration-via-vmm.html
Recently i have use QSM again, let me share some experience which i've encountered when using QSM.
Q. Can i use QSM on online and offline Virtual Machine?
A. Yes. You will experience interruption when the Virtual Machine is online. This happen, when VMM create a snapshot.
Q.Can i use QSM to migrate from a standalone Hyper V to Cluster Hyper V host?
A. Yes. VMM allow you to move VM to Cluster Hyper V host. Make sure VM Configuration and Virtual Hard Disk is point to Clustered Shared Volume. Once it move to Clustered Hyper V host , VMM will make the VM as High Available Virtual Machine (HAVM).
Q. Is iso files bind to VM move as well?
A. Yes. Make sure you unbind any iso file. This including vmguest.iso (Integration Services) after use.
Q. Will QSM move differencing disk and master image?
A. Yes. This is dangerous. QSM will not make a copy of master image. It will move both virtual hard disk. You will not be able to start other VM which is using the same master image. I advise you to use Export/Import feature to avoid problem later.
Stay Tuned and feel free to add comment regarding QSM experience that you have encountered...
Subscribe to:
Posts (Atom)