Search This Blog

Saturday, April 28, 2012

DPM Agent Reported Unavailable or Initial Replica Creation Stuck


Scenario:-

1. DPM agent installed on protected server running Windows Server 2008 R2 SP1

2. Agent reported Unavailable, However backup time occur, backup is successful.

3. Manual refresh the agent, status reported OK

4. Another scenario is when create initial replica. Data transfer is maintained at 0.19MB or small value. After 30 minute, the initial replica is still remain at small value without any changes.

Resolution:-

Disable TCP Chimney and RSS on Windows Server 2008

netsh int tcp set global chimney=disabled
netsh int tcp set global rss=disabled

Disable TCP Chimney and RSS on Windows Server 2003

Disable TCP Chimney:-
netsh int ip set chimney DISABLED

Disable RSS:
Modify the registry
  1. Click Start, click Run, type regedit, and then click OK.
  2. Locate and then click the following registry subkey:

    HKEY_LOCAL_MACHINE\SYSTEM\CurrentControlSet\Services\Tcpip\Parameters

  3. On the Edit menu, point to New, click DWORD Value, and then type EnableRSS.
  4. Double-click EnableRSS, type 0, and then click OK.
  5. Restart the computer on which you changed the EnableRSS value

View the status

netsh int tcp show global

image

Then modify Network connection, type the following command:

ncpa.cpl

Modify the properties of the backup NIC. Set to None / Disable on the Checksum Offload/LargeSend Offload and RSS

image

Once the above complete, the agent status reported OK and initial replica creation completed without any issue.

Sunday, April 22, 2012

Testing Deploy or Upgrade My Blog With Services Management Using VMM 2012


In today post, i am NOT going to talk about configuration. Just to share some common scenario that you can use Service Management in VMM 2012.

Most organization has Company Web Site, use Network Load Balancer and most important is often update the web site with the latest content.

Well, i don’t have company website but this is how i plan around with Service Management in VMM 2012

    • Content: My Blog (www.ms4u.info)
    • NLB     : Microsoft Network Load Balancing

Simple scenario:-

a) Created My Blog Website and use Service Template to deploy.

image

Service Template deployed. Use Microsoft Network Load Balancing to round robin the traffic into 2 web server virtual machine. If traffic increase, i can easily scale out the web server without any problem. Scale out refer to create additional virtual machine with the web site content.

Below is the figure depicted 2 VM for Web Tier. Each VM deployed is included with My Blog content.

image

My Blog Web Site content 1.0 result:-

image

When time pass by, i do need to make changes on the Website. Let say, upgrade my website content to 1.1. All you need to do is make necessary changes and push to your Services that you have created in VMM 2012.

image

It is just a simple click and automatically the content is push to entire Web Server. One of the cool feature about “Services” is it allow you to revert to previous content with just a click. Service Management in VMM 2012 allow you to perform above task without causing any damage to the existing Web Server operating system as content and operating system are separate.

Now let recap on the benefit of using “Services”

  • Scale Out Virtual Machine based on demand
  • Easily deploy Web Site content to entire Web Tier
  • Easy to apply/revert changes
  • Image based deployment. Operating system and Content are separated.

Sunday, April 15, 2012

VMM Configuration Analyzer 2012 (VMMCA)

va1

VMMCA is a tool that you should use before start to deploy VMM 2012. This tool is provided free by Microsoft. It is  a diagnostic tool that you can use to evaluate important post-installation configuration settings for computers that either might serve or are serving VMM roles or other VMM functions.

Pre-requisite:

1. Microsoft Baseline Configuration Analyzer 2.0 – Click here to download

2. Download VMMCA :- Click here

3. Install VMM 2012 Administrator Console

Supported product : VMM 2012

Step:-

1. Once complete, start Microsoft Baseline Configuration Analyzer first and then select System Center 2012– VMM Configuration Analyzer

image

2. Enter the following parameter and click Start Scan

image

3. VMM CA will scans the hardware and software configurations of the computers you specify, evaluates them against a set of predefined rules, and then provides you with error messages and warnings for any configurations that are not optimal.

Below is the sample scanning result:-

image

Saturday, April 14, 2012

Exception Error Message When Configure SCOM Integration With VMM 2012

Scenario:-

1. Configure PRO TIPS using SCOM 2012 and VMM 2012

Error message appear after configure the integration:

Operations Manager discovery failed with error: "Exception of type 'Microsoft.virtualmanager.enterprisemanagement.common.dicoverydatainvalidrelationshipsourceexception0m10' was thrown.

image

Thanks to SCOM Technet Blog, this issue has document in here.

Resolution:-

1. Install SCOM agent on the entire Hyper-V Host which managed by VMM 2012. By installing the SCOM agent to all hosts, the VM information can send directly to SCOM and did not go through SCVMM.

2. On the diagnostics, click Refresh.

That should do the trick.

Friday, April 13, 2012

Remove SCOM Integration With VMM 2012

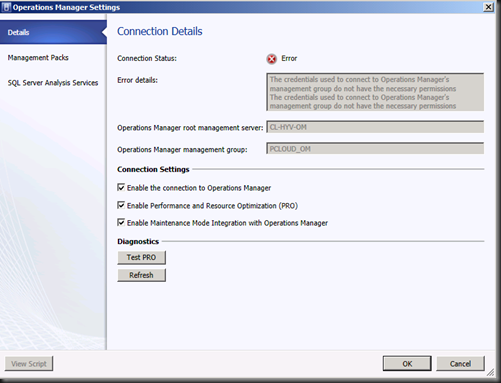
In today post, I'm going to share a way to remove the SCOM Integration with VMM 2012. Previously I've performed integration with SCOM 2012 (old vm) and VMM 2012. But forget to remove the integration when performing changing of new SCOM VM . Then on the VMM 2012 GUI, i cannot remove the integration by using GUI.

1

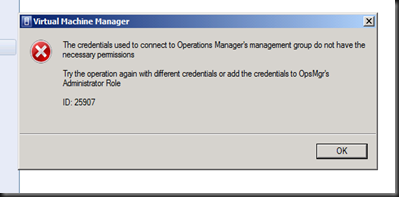
When try to remove from GUI, i will get the following error message

2

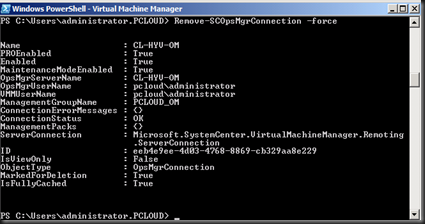
Therefore, i try my luck using Powershell

Remove-SCOpsMgrConnection -force

3

Now i can add in the new SCOM integration without any problem.

Thursday, April 12, 2012

SMI-S Provider Supported by VMM 2012

[Updated- 2 August 2012 ]
Check out this link to get more updated supported SMI-S Provider:- http://technet.microsoft.com/en-us/library/gg610600.aspx#BKMK_Arrays

[20 May 2012]-
Storage management is one of the features available in VMM 2012. You can use VMM 2012, to perform discover, perform classification and provision of storage to Hyper-V Host. At this moment, storage automation is supported on Microsoft Hyper-V Host.
In order for VMM 2012 to communicate with external storage, it require to use SMI-S Provider (Storage Management Initiative – Specification). The following is the supported SMI-S Provider
  • EMC Symmetrix or EMC CLARiiON CX (CX3 and CX4) version 4.3 or later

  • HP StorageWorks Enterprise Virtual Array (EVA) version 10

    • Built-in to HP StorageWorks CommandView EVA 10.0
  • NetApp FAS version 4.0 or later

  • The list of supported storage array will be updated soon.
    Step:-
    1. Download the SMI-S provider
    2. Install the SMI-S provider into an available host
    3. Add the provider to VMM Management Server
    Note:-
    Do not install SMI-S Provider in the VMM Management Server. This configuration is not supported by Microsoft.
    4. Create Storage Classification
    5. Discover Storage
    6. Create LUN, delete LUN through VMM
    7. Allocated LUN to Host Group
    Now, how about external storage which is NOT using SMI-S Provider ?
    VMM still uses VDS (Virtual Disk Service) hardware providers for SAN transfer functionality. However, you are require to configure the creation, deletion and assign LUN to Hyper-V Host from outside of VMM.

    Tuesday, April 10, 2012

    Backup VMM 2012 using DPM 2012

    DPM 2012 now has the capability to backup VMM 2012 using VMM Express Writer. The screenshot display VMM 2012 and VMM 2008 R2 SP1.

    For VMM 2012, you can just select VMM Express Writer.

    image

    By selecting VMM Express Writer, DPM will backup VirtualManagerDB.

    image

    Sunday, April 8, 2012

    Create SQL Server Virtual Machine Template

    Recently System Center 2012 RTM version is available to download from MSDN / Technet website. It is time for us to replace System Center RC to RTM. One of the common among the System Center product is majority require SQL Server to be preinstalled before install System Center product.

    In this article, we are going to look on creating a Virtual Machine template using VMM 2012. Follow below step to start create SQL Server Virtual Machine Template

    1. Deploy base operating system which consist of Windows Server 2008 R2 SP1 using VMM 2012.

    2. Once complete, mount SQL Server 2008 R2 Media to the virtual machine. Run setup.exe

    Note:- You only can sysprep sql server 2008 R2 version.

    3. Prepare SYSPEP SQL Server by select Advanced | Image preparation of a stand-alone instance of SQL Server.

    4. Once complete the SYSPREP SQL Server, sysprep the operating system by typing the following command;-

    sysprep.exe /oobe /generalize /shutdown

    5. Once the VM has shutdown, create Virtual Machine Template by using this Virtual Machine.

    Note:-

    a) For stand-alone deployment using Create VM, do not specify Application Profile and SQL Server Profile.

    b) For VM deploy using Service Template, you can create SQL Server Profile and include into the deployment.

    Below is the screenshot on the SQL Server Profile configuration:-

    a) SQL Server Deployment

    7a

    b) SQL Server Configuration

    8

    c) SQL Server Service Account

    9

    Error message if trying using VM Template with SQL Server Profile in a standalone VM Deployment

    11

    6. Now let get back to after VM deployment. In the Virtual Machine, Run Complete SQL Server 2008 R2 Installation

    The sysprep SQL will run. Specify the SQL product key, features to be installed, instance name, service account & collation, authentication type and SQL Server Administrator.

    That’s all for this moment. You have successful create a VM template with SQL Server and this will speed up the VM installation which require SQL Server.