Search This Blog

Saturday, January 19, 2013

How to Export VMDK from VMware Vcenter and V2V using VMM ?


In this article, we are going to look into how to copy the entire VM for V2V conversion (Vmware –> Hyper-V). In order to so, one of the way is

a) Copy the entire VMDK into VMM Library

b) Use P2V options. Means the VMware running in ESX is up and running. You can use VMM to perform P2V conversion

c) Use MVMC . You can refer to my previous post about MVMC here.

d) Use Export OVF

e) 3rd party tool.

For today post, let just focus on (a) and here is how we can achieve it

1. Open Vmware Vcenter console, select View | Inventory and Select DataStores and DataStore Cluster

image

2. Select the datastore, right click and select Browse datastore

image

3. Once Datatore browser open, select the VM that you would like to export out. Click the icon Download as highlighted in “red”. It will copy the entire VMDK and configuration to Vmware Vcenter local disk.

image

4. Then copy the entire folder and transfer to VMM Library.

5. Using VMM Console, select VM & Services workspace. On the toolbar, click “Create Virtual Machine” | “Convert Virtual Machine”

image

Just follow the wizard and VMM will convert the Vmware VM to Hyper-V format.

Webinar:- Increase Operational Efficiency with Global Deduplication and HA


Starwind Software is organizing a FREE webinar on 24 Jan 2013 (4pm GMT) to learn how to increase operational efficiency by using global deduplication and high availability

Some description about the webinar:-

Data is rapidly growing in the range of 50% or more per year thus affecting system performance, network congestion, and scalability.
Thankfully, the more backup data grows, the more Global Deduplication can increase operational efficiency and get a quick ROI. This top technology not only intensely reduces storage capacity needs, but it also provides load balancing and high availability (HA), allowing you to effectively manage your entire storage environment.

To register, click here

Sunday, January 13, 2013

Inconsistency Check Error When Backup VHD Using DPM


Scenario:-

  • 2 Node cluster running Win 2008 R2 Hyper-V
  • Backup has running successful for quite some times, then suddenly not sure why it failed. All the VM backup on 2nd node keep failing and has inconsistency check
  • Live Migrate VM to 1nd node, tested backup is successful
  • Live Migrate VM to 2nd Node, tested backup but failed. This include the entire VM and was unable to backup.
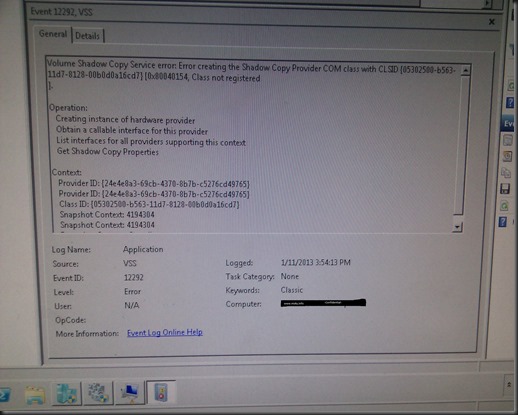
  • Check event viewer and saw a lot of VSS error but this error has appeared since a couple of month and backup is still working. The Event ID is  varies so that why i did not post it.

IMG_20130111_155457

Inconsistency check error occur has many reason and solution. So this is one of the solution that i have try.

Solution:-

From hardware VSS provider, i’m switching it to using Microsoft system VSS provider to give it a try. Go to registry and add new key “UseSystemSoftwareProvider”. Remember to perform backup registry before do below step.

[HKLM\Software\Microsoft\Microsoft Data Protection Manager\Agent\UseSystemSoftwareProvider]

This should force VSS to use In-Box VSS Software provider. Just change the key without reboot the server.

If the solution is working, then problem solve.

If NOT working, then just delete “UseSystemSoftwareProvider”.

Another solution that i did not try is remove the storage driver and reinstall to fix the hardware VSS provider. Probably this will work as well.

Hope this is one of the solution that you can try when you encounter “Inconsistency check” with indication of hardware VSS provider is failing.

Friday, January 11, 2013

Windows Server 2003 VM Login Screen Turn Black in Hyper-V


Scenario:-

The Win 2003 VM was up and running. Application was running without any problem. However, when console to Win 2003 VM, the login screen was black and user has difficulty to enter password. They need to guess and retry to make sure that they  enter the correct password.

After with several attempt, user was able to enter the correct password, they was able to access to windows. The user no longer see black screen but normal screen. But if user log off, the story begin again.

This is always happen when log off and screen back to black screen even you restart the VM

Resolution:-

Check your registry

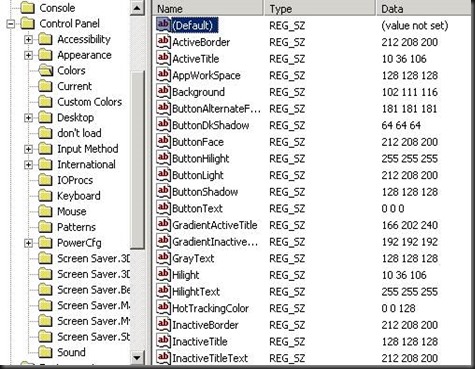
HKEY_USERS\.Default\Control Panel\Colors

The result is display as 0 0 0 (mean black)

image

To work around this issue, perform the following procedures:

  • Export the registry subkey from another Windows Server 2003-based computer
  • Click Start, point to Run, type regedit in the Open box, and then click OK.

Locate the following registry subkey:

HKEY_USERS\.Default\Control Panel\Colors

1. Right-click the Colors registry subkey, and then click Export.

2. In the File name box, type a name for the file.

3. Note the location where you will save the file, and then click Save.

Import the registry subkey into the affected computer

1. Click Start, point to Run, type regedit in the Open box, and then click OK.

2. On the File menu, click Import.

3. Double-click the .reg file that you want to import.

4. Quit Registry Editor, and then restart the computer.

By default, the setting for Windows Server 2003 look like this:-

clip_image002

After logging off and back onto the server (no reboot necessary) the colours had returned to what they were previously.

This solution is taken from :- http://support.microsoft.com/kb/906510

Free Ebook :- The Hands-on Guide: Understanding Hyper-V in Windows Server 2012


image

FREE ebook to www.ms4u.info reader and it’s provided by Veeam. I just downloaded a copy. Sneak preview of the ebook.

The Hands-on Guide: Understanding Hyper-V in Windows Server 2012 gives you simple step-by-step instructions to help you perform Hyper-V-related tasks like a seasoned expert.

You will learn how to:

  • Build clustered Hyper-V deployment
  • Manage Hyper-V through PowerShell
  • Create virtual machine replicas
  • Transition from a legacy Hyper-V environment, and more

Download the first 5 chapters (180 Pages) today!

You can find the information here http://go.veeam.com/wpg-backup-posey-henley-zerger-understanding-hyper-v-in-windows-server-2012.html?ad=home

Get it while stock last. Hurry..

Thursday, January 10, 2013

RHEL 5.9 Includes the Hyper-V Linux Integration Services built-in


redhat-logo Good News! Red Hat has just released Red Hat Enterprise Linux 5.9. One of the numerous improvement included Hyper-V Linux Integration Services built in into the operating system.

Check out the press about this good news:- http://www.redhat.com/about/news/press-archive/2013/1/red-hat-announces-general-availability-of-red-hat-enterprise-linux-5-9

image

Too bad, i cannot talk much and currently still waiting for people to give me an ISO to play around with this version. So if you got an ISO, do give it a try.

Update Rollup 1 for System Center 2012 SP1


Microsoft has released an updated rollup 1 for System Center 2012 SP1 to fix some of the bug. For more detail and download the update, please go to http://support.microsoft.com/kb/2785682.

This UR1 is only applicable for

  • System Center App Controller
  • System Center Data Protection Manager
  • System Center Operation Manager
  • Service Provider Foundation
  • System Center Virtual Machine Manager

Wednesday, January 9, 2013

Create Windows Server 2012 NFS File Share for Vmware


I’m going to setup Vmware Cluster but need NFS (shared storage) in my test environment. So in this article, we are going to look into how to configure NFS in Windows Server 2012

1. Add NFS roles by using Server Manager.

image

2. Then configure new NFS Share. Use Server Manager , click File and Storage Services and click Shares. Start the New Share Wizard, select NFS Share-Quick

image

3. Specify Share Name

image

4. In authentication method page, select “No Server authentication and Enable unmapped user access

image

5. Add share permission – “All machine – Read/Write” and tick Allow root access.

image

6. Then just proceed with the wizard till the end.

imageimage

7. In VCenter console, add a new datastore. Point to your Windows NFS server and the path that you have specified in previous step.

image

End result:-

image

Test upload a file into NFS datastore and if successful, then you can proceed to use for Virtual Machine deployment.

Can I Run Windows Server 2012 VM in Windows Server 2008 R2 or Windows Server 2008 Hyper-V?


Well, recently a lot of people ask me about this question. So the answer is “Yes” But before you deploy Windows Server 2012 VM, please remember to install this Windows Update

For x64 Windows Server 2008 - http://www.microsoft.com/en-us/download/details.aspx?id=34881

For x64 Windows Server 2008 R2 - http://www.microsoft.com/en-us/download/details.aspx?id=34633

For more details, please refer to KB 2744129

Sunday, January 6, 2013

Error Message “Video Remoting Was Disconnected” When VM Connect to a Virtual Machine


Scenario:-

Several virtual machine are running on a Hyper-V Machine but then when you try to remote into a VM using Hyper-V Manager or Failover Cluster Manager snap-in but was not able to connect to the VM. The error message that you received was

“Video Remoting Was Disconnected”.

Few things that you’ve try:-

a) Turn off VM and boot up that VM

b) RDP to VM and can access

But each time when try console using Hyper-V Manager snap-in, you will receive “Video Remoting Was Disconnected”. Plan to restart the entire Hyper-V Host, but cannot as i got a lot of Production virtual machine which is running.

Solution:-

Therefore this is one of the trick that i have tried

1. Go to physical NIC and disable

a) TCP Connection Offload (Ipv4 /ipv6)

b) TCP/UDP Checksum Offload (Ipv4 / ipv6)

image 

Then i try again and was able to connect to the VM without any problem. So give it a try and this solution probably will fix your issue.

Friday, January 4, 2013

Upgrade DPM 2010 to DPM 2012 SP1


It’s time to perform an upgrade for your old DPM server. There is no direct upgrade to DPM 2012 SP1 from DPM 2010. So you need to follow below upgrade steps.  I’m a bit stubborn and want to give it a try but an error message posted below stop me from proceed further.

image

So here is the step on  how i perform an  upgrade DPM 2010 to DPM 2012 SP1

Requirement:-

  • Operating system must be Windows Server 2008 R2 SP1

Steps:-

1. Backup DPM 2010 Database by using SQL Management Studio

image

2. Install DPM 2010 with QFE 7

  • DPM 2010 –> DPM 2010 QFE7

3. Perform an in-place upgrade

  • DPM 2010 with QFE –> DPM 2012

4. Then install DPM 2012 with CU3

  • DPM 2012 –> DPM 2012 CU3

5. Once you’ve installed with CU3, perform an in-place upgrade DPM 2012 to DPM 2012 SP1.

Well, after complete the upgrade,remember to upgrade DPM agent for the entire protection server. Good luck on your upgrade process.