Search This Blog

Wednesday, June 19, 2019

Setup Mail Backup as a Service Using Veeam

In today post, we are going to explore on providing Mail Backup as a Service using Veeam. As a service provider, you can start to provide  multi tenancy backup to Office365 users.

Here is a few comparison on different VB0365 deployment: on-prem, public cloud or service provider.


[Architecture]


To do so, as a service provider you need to have:
- Veeam Backup & Replication 9.5 Update 4a
- Veeam Backup for Office365 v3.0
- Veeam Cloud Connect infrastructure

Let begin the configuration .....
Note:- This guide is not full configuration from step by step but it able to guide you to provide Mail Backup as a Service.

[Service Provider]

1. Infrastructure must be ready for Cloud Connect (Cloud Gateway, Cloud connect server, etc]
-> create a new tenant without any assign resources (backup or vm replication). We just need a tenant for accessing to Cloud Connect infrastructure.
Example: Office365User1 for one tenant.


2. Then, must install Veeam Backup for Office365 on the SAME server with Cloud Connect Server.

3. On Veeam Backup for O365 console, [under General option]

a) Configure enable authentication to enable tenant authentication using organization credential & instruct VB0365 to use SSL certificate.


b) Configure enable REST-API


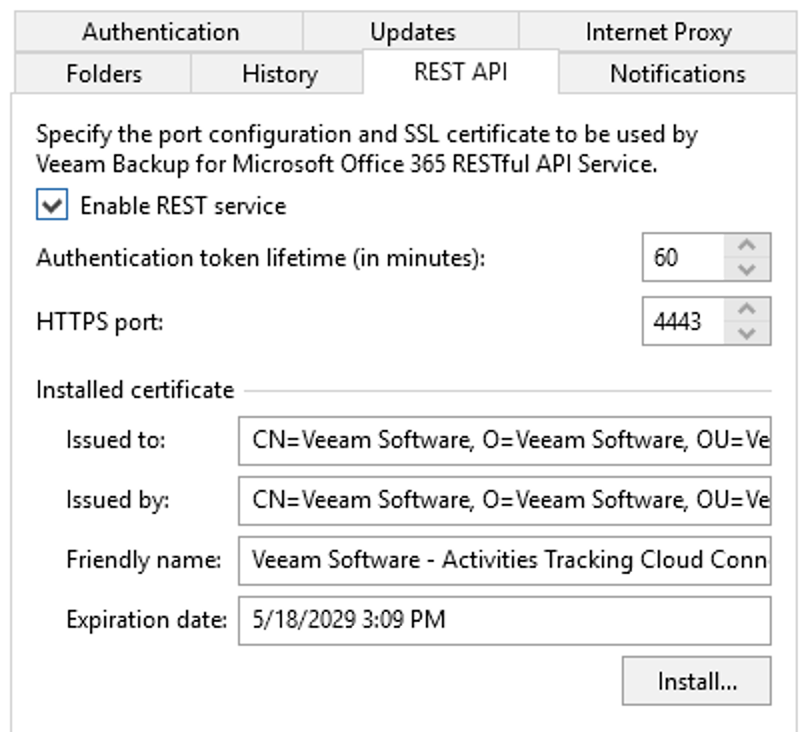
NOTE:- You can use same certificate for both VB0365 and Veeam Backup Server -Cloud Connect.

3. Start to protect O365 tenant using MS organization credential. Use different repository for each tenant. Service provider should receive the tenant microsoft organization crendential to connect to the tenant office365. The same credential will be used by tenant to perform self service recovery.


Now, as a service provider, you have enabled your infrastructure to provide Mail Backup as a Service using veeam solution for multi tenancy.

Let look at another side...the tenant!

[Tenant]

When come to disaster, tenant can use Veeam Explorer for Exchange, Sharepoint & OneDrive for Business to send self service recovery requests to the Veeam Backup for Microsoft Office 365 service provider server to restore their data. To do so,

1. Install Veeam Backup Server with Community Edition license. Tenant not require to purchase license.
2. Install Veeam Explorer from Veeam Backup for Microsoft Office365
3. Use VBR Console to connect to service provider. Located under Backup Infrastructure | Service Providers | Add Service Provider.

Use Office365User1 credential that you've created earlier to connect to service provider Cloud Connect.


4. Next, open Veeam Explorer for Exchange to add Store | Veeam Backup for MS Offfice 365 service provider


5. Select your service provider from pull down menu. This is available after added Service Provider in the Veeam Console.

Provide Microsoft Organization tenant credential . Same credential use when perform backup O365.


If credential correct, tenant able to view their organization data & perform granular item level recovery.


That's concluded our short guide.

Hope this help VCSP to start provide "Mail Backup as a Service"

Tuesday, June 11, 2019

Migrate Old Veeam Repository to New Repository

We are going to explore on how to migrate old veeam repository to new repository.

This usually happened when existing repository has insufficient storage to cater for data growth, ages hardware or migrate to new storage.

Most of the partner will deploy as standalone veeam repository. One of the traditional approach to migrate was using copy & paste existing backup data to new repository, rescan & reconfigure backup job

Well, this method is tedious process!

To do faster & easy migration, you just need to configure "Scale Out Backup Repository"- SOBR.

Without any hassle, follow these simple steps:
1. Create new repository for new storage
2. Create SOBR

3. Add old repository and new repository into SOBR. Previous backup job will modify to use SOBR


You can verify if previous backup job destination has changed.


5. Set maintenance mode on old repository


4. Use Evacuate.Backup data will move from old repository to new repository.


5. Remove old repository from SOBR


Thats should do the trick!

Good luck on migrate backup data from one repository to another repository

Wednesday, June 5, 2019

Backup Laptop to Cloud

In today post, we are looking on how to protect contractor laptop/desktop/workstation data using Veeam solution to local service provider. These local service provider is called VCSP - Veeam Cloud Service Provider, which has owned data center & leverage on Veeam to provide Backup as a Service (BaaS).

Scenario:

  • Customer would like to protect contractor laptop running operating system: Windows 7 or higher edition such as Windows 10
  • Prevent contractor from modify company backup policy
  • Backup able to take place from anywhere & anytime without establish connection to corporate office
  • Leverage on local cloud service provider to store backup data
  • Able to restore backup data 

Propose solution:

  • Use Veeam agent to protect workstation: entire volume, per volume or data
  • Backup data will transfer to local service provider securely using SSL/TLS connection
  • Leverage on Veeam cloud connect features.
  • Central management on agent deployment, policy deployment & tenant management

Let explore on how we do it for different categories of people. 
Note: No step by step guide. Assuming that you've the knowledge about Veeam products & should able to find the configuration.

[@ Service Provider]

Environment:
  • Cloud Connect Infrastructure is ready for BaaS. 
  • Has Veeam Availability Console (VAC) setup. 
  • Created tenant & assigned to plan. In this example, we will use Tenant Alpha from Alpha Corp Sdn Bhd
  • Credential for Tenant Alpha will send to customer via email.
[@ Tenant - Alpha from Alpha Corp Sdn Bhd ]

  • Login to VAC portal using credential that receive by an email,
  • After login to portal, tenant require to create a discovery rule to discover all workstation that would like to protect. You can discover workstation by using network segment, Active Directory or CSV file.


  • After create the discovery policy, run it & should able to find your workstation. Just set discovery without apply a policy. We will define on next step.

Next, create a backup policy that you would like to apply to workstation.


Select operation mode "Workstation". It is for client guest operating system.


Define backup mode that you would like to protect. We select "Entire computers".


Next step is crucial. Select destination "Veeam Cloud Connect Repository". Backup data will send to VCSP.


Define retention period to keep backup data.


On next page, define backup quota that you want to split to sub tenant.
By default, tenant Alpha will get his large quota that he subscribe from service provider. Example: 10 TB.

To avoid all tenant stored till 50TB, he will specify user quota. Let say limit each users to store backup data up to 1TB. With sub tenant option, backup data will store according to laptop name.
Example: Alpha_LaptopName


Next step is define the scheduling & other backup options.


In this stage, we have create discovery rules & backup policy.

Next process is deploy veeam agent from VAC. Provide the credential that able to perform installation on target workstation & select the backup policy to apply.
Do make sure, you have one host act as master. This can easily assigned from VAC console.Master agent & all workstation must has access Internet.


  • Master agent require Internet to download latest veeam agent installer from veeam
  • All workstation require Internet to transfer backup data to local service provider.


Below is the deployment process after run the job.


From VAC console, you able to view target repository. It displayed as "tenant_laptopname".
Example:
  • alpha_Win10B_repository
  • alpha_Win10_repository


[ On Workstation ]
  • Agent deployed
  • Backup run according to schedule
  • Backup data securely transfer to local service provider without VPN
  • Contractor unable to modify backup policy. This option has locked down to prevent any modification


To summarise the total solution:
  • Customer able to ensure their contractor data is securely backup & store @local service provider
  • Contractor has no control to prevent or modify backup policy.
  • With backup cache option on veeam agent, backup data will backup even without Internet access. Once contractor connect to Internet, backup data will transfer to local service provider
  • No Site to site vpn involved. Data is securely transfer to local service provider.
  • Finally customer has control on corporate data

Tuesday, June 4, 2019

Upgrade Veeam Availability for Nutanix

In this post, we are going to upgrade Veeam Availability for Nutanix (AHV) to latest version.

Current version is VAN 1.0 Update 1
New version is VAN 1.0 Update 2. Download from veeam website.

It is a straight forward process. Just upload new virtual appliance & import configuration will do.

Let start the upgrade process...

First, you need to backup existing backup configuration. Login to proxy virtual appliance | go to Appliance Settings | Click Config Backup


Tick items Common & Events & provide password to protect the config.

Turn off existing proxy virtual appliance & import new virtual appliance.

Power it new virtual appliance. After login in, select RESTORE option


Select your config backup & provide the password.


Retain the credential & IP address. This will maintain the previous proxy configuration & import previous job.


Do note that, you need to re-insert VAN license file.


Voila! You have upgraded VAN to latest version. Once everything running fine, you can remove the previous virtual appliance.


Saturday, June 1, 2019

LAN Network Performance Speed Transfer Test

Ever encounter slow network transfer speed? Most of time, we will measure by trying copy & paste large files from source to destination.

However i prefer to to use a tool called "LAN Speed Test". It is a powerful tool to measure file transfer on LAN speed (wired or wireless).

First, you pick a destination, select packet size (1GB) & click "Start Test"


LAN Speed Test will transfer the file & measure upload (writing) & download (reading).

You can view the result of the network performance, by looking on Mbps.


To download, click here