Search This Blog

Tuesday, April 30, 2013

Unable to Live Migrate Virtual Machine Running in Windows Server 2012 Hyper-V


Scenario:-

  • Windows Server 2012 Hyper-V
  • Cluster is up and running
  • Virtual machines are running and able to boot up
  • Quick migration is working
  • No problem when ping to target host

Problem:-

  • Unable to Live Migrate virtual machine to another host

After a long dig, got an error on the Server Manager dashboard. Click on Error found that it display “target name resolution and kerberos security error”

image

On the event viewer, Event id 1196 indicated an error"

“Cluster network name resource 'Cluster Name' failed registration of one or more associated DNS name(s) for the following reason:
The handle is invalid.
Ensure that the network adapters associated with dependent IP address resources are configured with at least one accessible DNS server”

Use nslookup command to resolve the cluster name but failed. No record was found

How about manual re-create the dns record? Well, tried that but it did not work. You need to allow it automatically create the A record by itself.

Resolution:-

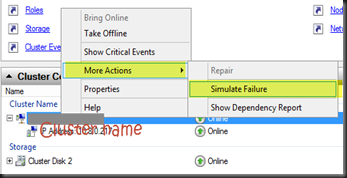
a. Go to Cluster Core Resources | Right click the cluster and set Simulate Failure. Wait till it Failed.

image

SNAGHTMLaeed4e

b. Once failed, right click the cluster name, More Actions and select Repair.

I’ve tried three times, then only the cluster A record was successfully created.

Relevant Post:-

Wednesday, April 24, 2013

Creating High Availability Virtual Machine Using Powershell–Part 3


Let continue from where we left in previous parts

Part 1 – talked about converting sysprep image and create new virtual hard disk

Part 2 – talked about creating VM configuration by using hard disk from Part 1 and configure VM settings.

In our next part, we will discuss about creating high availability virtual machine whereby the created VM has located in Cluster Shared Volume (CSV). Here is the example to guide you in this article

Example:-

VM Name Priority Preferred Owner
Donut High Server1
Eclair Low Server1
Froyo Medium Server2
Gingerbread Low Server2
HoneyComb Low Server2
IceCream Low Server1

Let look into how we should configure using Powershell

1. Add VM as High Availability Virtual Machine

Cmdlet:- Add-ClusterVirtualMachineRole

Add-ClusterVirtualMachineRole -VirtualMachine Donut
Add-ClusterVirtualMachineRole -VirtualMachine Exclair
Add-ClusterVirtualMachineRole -VirtualMachine Froyo
Add-ClusterVirtualMachineRole -VirtualMachine Gingerbread
Add-ClusterVirtualMachineRole -VirtualMachine HoneyComb
Add-ClusterVirtualMachineRole -VirtualMachine IceCream

2. Configure Preferred Owner

Cmdlet :- Set-ClusterOwnerNode

Set-ClusterOwnerNode -Group Donut -Owner Server1
Set-ClusterOwnerNode -Group Exclair -Owner Server1
Set-ClusterOwnerNode -Group Froyo -Owner Server2
Set-ClusterOwnerNode -Group Gingerbread -Owner Server2
Set-ClusterOwnerNode -Group HoneyComb -Owner Server2
Set-ClusterOwnerNode -Group IceCream -Owner Server1

3. Configure Priority

Cmdlet:- Get-ClusterGroup.Priority

Value for :-

High – 3000

Medium –2000

Low - 1000

(Get-ClusterGroup Donut).Priority=3000
(Get-ClusterGroup Exclair).Priority=1000
(Get-ClusterGroup Froyo).Priority=2000
(Get-ClusterGroup Gingerbread).Priority=1000
(Get-ClusterGroup HoneyComb).Priority=1000
(Get-ClusterGroup IceCream).Priority=1000

4. Automatic Fallback

Cmdlet:- GetpClusterGroup.AutoFailbackType

Set value to 1 will configure as “Immediately” fallback

(Get-ClusterGroup Donut).AutoFailbackType=1
(Get-ClusterGroup Exclair).AutoFailbackType=1
(Get-ClusterGroup Froyo).AutoFailbackType=1
(Get-ClusterGroup Gingerbread).AutoFailbackType=1
(Get-ClusterGroup HoneyComb).AutoFailbackType=1
(Get-ClusterGroup IceCream).AutoFailbackType=1

In this Part 3, you have learned to add HA Virtual Machine to the cluster, set Preferred Owner, Priority and FallBack.

Now that is the end of this part on how to create virtual machine using Powershell. Hope you have learned a lot.

Relevant Post

Monday, April 22, 2013

COUNTDOWN TO V7 New Veeam Backup & Replication


Excitement is growing! We’ve already told you about many of the great new features coming in Veeam Backup & Replication™ v7. And we're not done yet—we still have even more new v7 features to tell you about in the next few weeks.

Previously announced v7 features:

image

image


image

image


Veeam delivering another option for archiving Veeam backups - disk, cloud and tape. Archive to Tape in v7:

•  

Supports virtual tape libraries (VTLs), tape libraries and standalone drives


•  

Tracks specific VMs and restore points on tape for easy restores


•  

Backs up files from Windows and Linux servers (virtual or physical) to tape for FREE

image

Learn more, please click here

Tuesday, April 16, 2013

Creating Virtual Machine Using Powershell–Part 2

In our previous post, we have talked about converting sysprep image and create new virtual hard disk. We will continue to talk about an additional three cmdlet when creating virtual machine. The next step is create virtual machine configuration file with the converted sysprep image.

Example:-

VM Name Start Up Memory VHD Path Virtual Switch Name
Donut 1 GB C:\ClusterStorage\Volume1\Donut\ vSwitch-Production
Eclair 2 GB C:\ClusterStorage\Volume1\Eclair\ vSwitch-Production
Froyo 4 GB C:\ClusterStorage\Volume1\Froyo\ vSwitch-Production
Gingerbread 2 GB C:\ClusterStorage\Volume1\Gingerbread\ vSwitch-Production
HoneyComb 2 GB C:\ClusterStorage\Volume1\HoneyComb\ vSwitch-Backup
Ice Cream 2 GB C:\ClusterStorage\Volume1\IceCream\ vSwitch-Production

The virtual machine configuration and virtual hard disk are stored in Cluster Shared Volume. Some VMs are using vSwitch-Production virtual switch and 1 VM is using vSwitch-Backup. The VM boot up with the amount of memory that defined in start up memory.

Cmdlet:-

1. Cmdlet 3:- New-VM –> to create new VM Configuration with the setting as listed above

VM 1:- Donut
new-vm –name Donut -MemoryStartupBytes 1GB -VHDPath C:\ClusterStorage\Volume1\Donut\DonutDisk1.vhdx -SwitchName vSwitch-Production

VM 2:- Eclair
new-vm –name Eclair -MemoryStartupBytes 2GB -VHDPath C:\ClusterStorage\Volume1\Eclair\EclairDisk1.vhdx -SwitchName vSwitch-Production

VM 3:- Froyo
new-vm -name Froyo -MemoryStartupBytes 4GB -VHDPath C:\ClusterStorage\Volume1\Froyo\FroyoDisk1.vhdx -SwitchName vSwitch-Production


VM 4: Gingerbread
new-vm Gingerbread -MemoryStartupBytes 2GB -VHDPath C:\Clusterstorage\Volume1\Gingerbread\GingerbreadDisk1.vhdx -SwitchName vSwitch-Production


VM 5:- HoneyComb
new-vm HoneyComb -MemoryStartupBytes 2GB -VHDPath C:\ClusterStorage\Volume1\HoneyComb\HoneyCombDisk1.vhdx -SwitchName vSwitch-Production


VM 6:- Ice Cream
new-vm IceCream -MemoryStartupBytes 2GB -VHDPath C:\ClusterStorage\Volume1\IceCream\IceCreamDisk1.vhdx -SwitchName vSwitch-Production

2. Cmdlet 4:- Set-VM –> to configure a virtual machine with an additional settings.

Once VM Configuration has created , let add an additional setting into our example

VM name Virtual Processor Minimum Memory Maximum Memory Automatic Start Action
Donut 2 512 MB 2 GB Nothing
Eclair 2 1 GB 6 GB Nothing
Froyo 2 Static Memory   Nothing
Gingerbread 2 1 GB 6 GB Nothing
HoneyComb 4 1 GB 6 GB Nothing
Ice Cream 4 1 GB 4 GB Nothing


VM 1:- Donut

set-vm Donut -ProcessorCount 2 -DynamicMemory -MemoryMinimumBytes 512MB -MemoryMaximumBytes 2GB -AutomaticStartAction Nothing

VM 2:- Eclair

set-vm Eclair -ProcessorCount 2 -DynamicMemory -MemoryMinimumBytes 1GB -MemoryMaximumBytes 6GB -AutomaticStartAction Nothing

VM 3:- Froyo

set-vm Froyo -ProcessorCount 2 -StaticMemory -AutomaticStartAction Nothing

VM 4: Gingerbread

set-vm Gingerbread -ProcessorCount 2 -DynamicMemory -MemoryMinimumBytes 1GB -MemoryMaximumBytes 6GB -AutomaticStartAction Nothing

VM 5:- HoneyComb

set-vm HoneyComb -ProcessorCount 4 -DynamicMemory -MemoryMinimumBytes 1GB -MemoryMaximumBytes 6GB -AutomaticStartAction Nothing

VM 6:- Ice Cream

set-vm IceCream -ProcessorCount 4 -DynamicMemory -MemoryMinimumBytes 1GB -MemoryMaximumBytes 4GB -AutomaticStartAction Nothing

HoneyComb and Ice Cream VM are configure to use 4 vcpu whereby the rest is set to use 2 vcpu. 2 vcpu is the supported virtual processor that we can configure for Windows Server 2003 VM. (please refer to previous post) Meanwhile, only Froyo VM is using static memory whereby the rest are using Dynamic memory features.

3. Cmdlet Add-VMHardDiskDrive – allow to add an additional hard disk to the VM

VM 2:- Eclair

Add-VMHardDiskDrive Eclair -ControllerType SCSI -ControllerNumber 0 -ControllerLocation 0 -Path C:\ClusterStorage\Volume1\Eclair\EclairDisk2.vhdx

VM 3:- Froyo

Add-VMHardDiskDrive Froyo -ControllerType SCSI -ControllerNumber 0 -ControllerLocation 0 -Path C:\ClusterStorage\Volume1\Froyo\FroyoDisk2.vhdx

VM 4: Gingerbread

Add-VMHardDiskDrive Gingerbread -ControllerType SCSI -ControllerNumber 0 -ControllerLocation 0 -Path C:\ClusterStorage\Volume1\Gingerbread\GingerbreadDisk2.vhdx

VM Éclair , Froyo and Ginderbread required an additional virtual hard disk and assigned to SCSI Controller (please refer to previous post to this requirement)

In this Part 2, you have learned to create new virtual machine, configure a virtual machine and add new disk to the VM. Three cmdlet to remember:- New-VM, Set-VM and Add-VMHardDiskDrive. Stay Tuned for Part 3 for an additional cmdlet.

Relevant Post

Friday, April 12, 2013

NIC Showing “Network Cable Unplugged” on Intel NIC


Last week we’ve encountered a symptom “Network Cable Unplugged” on the Intel NIC which resides in DELL R720. Our scenario consists of 4 Broadcom NIC and 4 Intel NIC (Label as LAN5, 6, 7 and 8). Then we realized that sometimes the NIC on either LAN 5, 6 or 7 will shown unplugged. We initially thought that it is because cable loose. However , it is not the CAT6 issue. Our temporary solution is “Disable” and “Enable” the NIC and the connection will back to normal. However this is just a temporary solution as the symptom is back.

Next action is

1. Update the NIC with latest driver

2. Disable TCP Offload

However it is not solved. Next this is our solution

Resolution

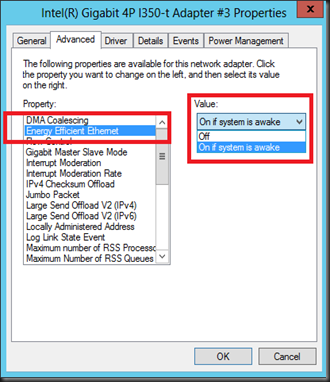
Disable Energy Efficient Ethernet

1. On the Intel NIC, go to Advanced | On Energy Efficient Ethernet | Set the value to Off.

4-12-2013 11-28-11 AM

Now after a week of monitoring, our issue of “Network Cable Unplugged” on the Intel NICs are solved and no more interruption to the Hyper-V Server.

image

Creating Virtual Machine Using Powershell–Part 1

This is Part 1 of the scripting using Powershell. Total of 7 cmdlet from Windows Server 2012 Hyper-V that we are going to use.

Scenario:-

Recently we involved in nationwide branch deployment and each branches require to setup Windows Server 2012. As usual, MIS people has been assigned to be onsite to do hardware setup and enable remote desktop for us (consultant) so we can remotely configure the cluster. The scope is

a) branch people:-

  • Install operating system
  • Configure LUN
  • Enable RDP

b) HQ people

  • Setup Hyper-V
  • Configure Virtual Machine

Interesting to configure virtual machine in GUI but the process of clicking the GUI is a bit tedious on each configuration and took us few hours to configure few VMs. After a few sites of deployment, finally we’ve decided to simplify some of the work by using Powershell.

Here is an example:-

Step 1:-

Convert sysprep image and create new fixed disk for six virtual machines. For the blog purpose, I’m just going to use Android version as the virtual machine name to represent different name

VM Name Operating System Sysprep folder
Donut Windows Server 2003 with SP2 D:\AndroidISO\VHD\SYSPREP\W2K3ENT_30GB.vhd
Eclair Windows Server 2003 with SP2 D:\AndroidISO\VHD\SYSPREP\Web\WebDisk1.vhd
2nd new fixed disk = 50GB
Froyo Windows Server 2003 with SP2 D:\AndroidISO\VHD\SYSPREP\Web-DB\DBDisk1.vhd
D:\AndroidISO\VHD\SYSPREP\Web-DB\DBDisk2.vhd
Gingerbread Windows Server 2003 with SP2 D:\AndroidISO\VHD\SYSPREP\App\AppDisk1.vhd
2nd new fixed disk = 50GB
HoneyComb Windows Server 2012 D:\AndroidISO\VHD\SYSPREP\App\AppDisk1.vhd
IceCream Windows Server 2008 R2 D:\AndroidISO\VHD\SYSPREP\W2K12STD_50GB.vhdx

Cmdlet:

1. Cmdlet 1:- Convert-VHD – use to convert existing dynamic sysprep image to VHDX and Fixed Disk

2. Cmdlet 2:- New-VHD – create a new fixed virtual disk with the size 50GB

VM 1: Donut

convert-vhd -Path D:\AndroidISO\VHD\SYSPREP\W2K3ENT_30GB.vhd -DestinationPath C:\ClusterStorage\Volume1\Donut\DonutDisk1.vhdx -VHDType Fixed

VM 2: Eclair

convert-vhd -Path D:\AndroidISO\VHD\SYSPREP\Web\WebDisk1.vhd -DestinationPath C:\ClusterStorage\Volume1\Eclair\EclairDisk1.vhdx -VHDType Fixed
new-vhd -Path C:\ClusterStorage\Volume1\Eclair\EclairDisk2.vhdx -size 50GB –Fixed

VM 3:- Froyo


convert-vhd -Path D:\AndroidISO\VHD\SYSPREP\Web-DB\DBDisk1.vhd -DestinationPath C:\ClusterStorage\Volume1\Froyo\FroyoDisk1.vhdx -VHDType Fixed
convert-vhd -Path D:\AndroidISO\VHD\SYSPREP\Web-DB\DBDisk2.vhd -DestinationPath C:\ClusterStorage\Volume1\Froyo\FroyoDisk2.vhdx -VHDType Fixed

VM4: Gingerbread

convert-vhd -Path D:\AndroidISO\VHD\SYSPREP\App\AppDisk1.vhd -DestinationPath C:\ClusterStorage\Volume1\Gingerbread\GingerbreadDisk1.vhdx -VHDType Fixed
new-vhd -Path C:\ClusterStorage\Volume1\Gingerbread\GingerbreadDisk2.vhdx -size 50GB –Fixed

VM 5: HoneyComb


convert-vhd -Path D:\AndroidISO\VHD\SYSPREP\W2K12STD_50GB.vhdx -DestinationPath C:\ClusterStorage\Volume1\Honeycomb\HoneycombDisk1.vhdx -VHDType Fixed

VM 6: IceCream


convert-vhd -Path D:\AndroidISO\VHD\SYSPREP\W2K8STD_50GB.vhdx -DestinationPath C:\ClusterStorage\Volume1\IceCream\IceCreamDisk1.vhdx -VHDType Fixed

In this Part 1, you have learned to convert VHD to VHDX and create new virtual hard disk. Two cmdlet to remember :- Convert-VHD and New-VHD. Stay tuned for Part 2 and we still got few more cmdlets to revealed.

Relevant Post :

Thursday, April 11, 2013

My Reviewed Book Has Arrived


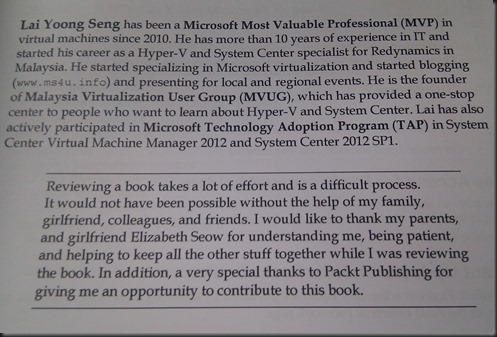
Do you still recall on my previous post about the book which I’ve worked as Technical Reviewer. After wait for almost 2 week, finally a hardcopy arrived to my house. I’ve been reading few books but holding my own reviewed book felt a bit strange.

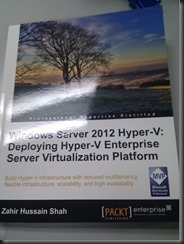
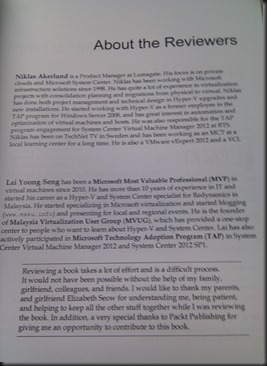
The first step that I do was finding my name in the book. Found it in page 2 and 3 and here is picture of it:

Front page :- Windows Server 2012 Hyper-V: Deploying Hyper-V Enterprise Server Virtualization Platform.

IMG_20130411_093446

Page 2:- Credits page. Look at Reviewer….

IMG_20130411_093502

Page 3 :- About the Reviewer

IMG_20130411_093648

My few words…

IMG_20130411_093700

A small token of appreciation on reviewing the book. Glad that it finally out in the public and look like I’m going to spend the whole weekend doing some reading on it.

Wednesday, April 10, 2013

Update Rollup 2 System Center 2012 SP1 is Available


Good news! UR2 is for System Center 2012 SP1 is available to download. Bug fix is listed in here.

Manual download the update is available as listed below. No SCVMM and SCCM update.

App Controller (KB2815569)

Download Download the App Controller update package now.

Operations Manager (KB2828615)

Download Download the Operations Manager update package now.

Operations Manager - UNIX and Linux Monitoring (Management Pack Update) (KB2828653)

Download Download the Operations Manager Cross Platform update package now.

Service Manager (KB2828618)

Download Download the Service Manager update package now.

Orchestrator (KB2828616)

Download Download the Orchestrator update package now.

Data Protection Manager (KB2822782)

Download Download the Data Protection Manager update package now.

Tuesday, April 9, 2013

Is Live Migration Supported Pass Through Disk in Windows Server 2012 Hyper-V?


haha…this question is a bit tricky. Well, just heard news from here (has taken out), that pass-through disk is “NO” longer supported in live migration operation.

[Updated]- 12 April 2013

The answer is “Yes”. It is still supported after confirmation from Hyper-V Product product group, Redmond

For those of you who are not familiar with “Pass-thorough” disk, let me give a do a bit of explanation.

Pass through disk is also known as raw disk. It is exactly like a LUN that we present directly to the VM. Well, in term of performance is still consider the best among all different types of disk (fixed, dynamic or differencing disk) but it did came with a limitation : Portability. You cannot export or easily move the disk to another Hyper-V host. We often use this disk when our VM require more than 2TB of hard disk size. But with Windows Server 2012, we can now relies on VHDX (support up to 64TB) and fixed disk has almost the same performance as pass through disk. Refer to below comparison and additional whitepaper on Virtual Hard Disk Performance.

Compare the physical disk vs fixed disk. Both disk performance is almost identical.

So, when design your implementation, please don’t use Pass Through Disk but choose fixed disk if you would like to do live migration

Relevant post:

Announcement :- 9 April 2013


Quick update from Starwind:-

First of all, StarWind has entered into an OEM agreement with Western Digital. Under the terms of this agreement, the released software upgrade v1.5.7.30 adds the new ability for WD Sentinel™ DX4000 small office storage server to act as an iSCSI target. The support for iSCSI Storage Area Network (SAN) with newly introduced iSCSI target capability is powered by StarWind™:

http://www.starwindsoftware.com/news/96

And also, StarWind Software reached the final of the Datacentre Solutions (DCS) Awards 2013 in the Datacentre Storage Software Product of the Year category:

http://www.starwindsoftware.com/news/95

Sunday, April 7, 2013

Cloning Domain Controller


Today, during my study for 70-417 Exam, i have learned on how to cloned domain controller from this book. It is not that difficult to setup a Clone Domain controller without using the traditional method. here is the step on how you should do it:

My scenario

  • DC1 – Holding 5 FSMO roles. PDC in Windows Server 2012
  • DC2 – an additional domain controller without PDC Emulator roles
  • Windows Server 2012 Hyper-V Server

Requirement

Three different server must be running Windows Server 2012:-

1. Host server with Hyper-V server role installed which the source DC Vm is residing.

2. Server (either physical or virtual) which is the same domain as the VM to be cloned and holding PDC Emulator operation master role

3. Source VM to be cloned is a domain controller without holding PDC Emulator operation master role

On a Domain Controller

First, add the source VM into Cloneable Domain Contoller security group by using Active Directory Administrative Center

1. Open Active Directory Administrative Center | Go to Domain Controller container | Right click the DC and select Add to Group | Cloneable Domain Controller. Example: DC2 is the source VM and DC1 is the domain controller which is holding PDC emulator role

image

image

On the source DC VM

Open Powershell and execute Get-ADDCCloningExcludedApplicationList cmdlet. This cmdlet will detect and list application/services that are not evaluated for cloning and that are installed in the source DC VM

Get-ADDCCloningExcludedApplicationList

image

If the cmdlet return of services/application, review the list and check with software vendor to identify if it suitable for cloning. If not suitable, please uninstall the program.

If it is suitable to be cloned, you need to create inclusion list called CustomDCCloneAllowList.xml by using the following command:

Get-ADDCCloningExcludedApplicationList –GenerateXml –Path C:\Windows\NTDS –Force

Next, is run a list of pre-requisite check on the source VM and generate clone configuration file DCCloneConfig.xml

New-ADDCCloneConfigFile

image

Then, shutdown the VM. Export the VM and move it to the destination Windows Server 2012 Hyper-V.

On the destination Windows Server 2012 Hyper-V

1. Import the VM using the option “Copy the Virtual Machine (create a new unique ID)”

image

2. Boot the VM and just wait till the DC cloning process to complete.

image

Once the process complete, you have 1st clone DC in your environment.

Thursday, April 4, 2013

Announcement:- Finalist for Storage Award 2013


StarWind was named as a finalist for the Storage Awards 2013 in "Storage Virtualisation Product of the Year" category.

Here is a link to their Press Release: http://www.starwindsoftware.com/news/94

Upcoming Webinar:-

Live Webinar: Simplifying Shared Storage for Hyper-V Environments

Max Craft, Solution Engineer, StarWind Software, Inc.

LIVE WEBINAR on Wednesday, April 10
     1:00 PM GMT / 1:00 PM EDT

FEATURED SPEAKER:
     Max Craft
, Solution Engineer, StarWind Software, Inc.


StarWind Native SAN for Hyper-V is an ideal mix of affordable price, great performance, reliability and simplicity. Join our LIVE webinar to learn how you can utilize this powerful tool for more advanced IT goals and allow Hyper-V administrators to:

  • Meet growing network and data storage needs
  • Reduce costs more than 50%
  • Increase efficiency and speed ROI

Click here to register for this FREE webinar:

Register for Webinar

1:00 PM - 2:00 PM GMT


Register for Webinar

1:00 PM - 2:00 PM EDT

Wednesday, April 3, 2013

Configure CPU Compatibility For Migration Using Powershell


If you have two different model of CPU (example:- E7-8830 or X5680) on your environment and would like to move the virtual machine from one Hyper-V Server to another Hyper-V server, you are require to configure Processor Compatibility. Both server processor can be different family as long it is belong to the same manufacturer. Example:- Intel – Intel, AMD-AMD.

You cannot move VM from different manufacturer (Intel – AMD).

In GUI, you can easily configure this setting from each VM by right click | Settings| Processor | Compatibility.

Tick Migrate to a physical computer with a different processor version

image

You can achieve faster way by using Powershell.

Get-VMProcessor –VMName *

image

Condition:-

In order to configure CPU Compatibility, the VM must be in “Turn Off” State. To check which VM in “Off” state, you can type the following command:

Get-VM *

image

The command will list down the entire VM state. Those VM listed as “Off” can be configure for CPU Compatibility For Migration

Set for particular VM

To configure CPU Compatibility for a particular VM. Let say “CL-HYV-VE01” vm. Type the following command

Set-VMProcessor –VMName CL-HYV-VE01” –CompatibilityforMigrationEnabled $true
Get-VMProcessor *

image

Set for Multiple VM

Use the command Get-VMProcessor, piping and Set-VMProcessor together to configure multiple VMs

Get-VMProcessor –VMName * | Set-VMProcessor –CompatibilityForMigrationEnabled $true
Get-VMProcessor –VMName *

Result in Powershell:-

image

Note:- Refer to highlighted in “yellow”

Result in GUI:-

image

Migrate to a physical computer with a different processor version has ticked.

Monday, April 1, 2013

Dismount ISO or DVD From the VM By Using Powershell


Getting a bit tired of checking which VMs are having iso mounted and still cannot figure out why people forget to dismount the iso from the VM after using it.

Imagine you got 20 , 30, 40 or 100 VM in your environment. Are you going to use GUI to check each one of them. Well, I’m a bit lazy so the faster way to achieve this is by using Powershell.

Get-VMDvdDrive –Vmname *

This will display the entire VM which is connected to DVD. For those VMs that is not connected to iso will be displayed as “None” on the DvdMediaType Path. My example below shown 2 VMs are connected to iso and listed Controller Number and Controller Location of the DVD Drive.

1

Next step, how to remove the iso/dvd the faster way without using GUI after identified which VMs having the iso?

Set-VMDvdDrive –VmName Red-SQL –ControllerNumber 1 – ControllerLocation 0 –Path $null

2

The command will connect to the VM and eject the DVD/iso from the VM.

View the result again by typing the command Get-VMDvdDrive

3

Thanks to Powershell, I can faster dismount the DVD/ISO from the VM.

Remote Desktop to Your Hyper-V Server From Android Tablet


Been searching around and test remote application that is suitable to remote desktop Windows Server 2012 Hyper-V from my nexus 7 (android tablet). Finally I manage to find one out of thousand app available from Google Play. In this post, we are going to look into how to remote to your Hyper-V server from your android tablet / phone.

Download

1. Download SplashTop 2 –Remote Desktop app from Google Play to your Android Tablet. – click here

image

2. Download streamer program and install into your Hyper-V Server. – click here

Configuration on the Hyper-V Server

1. After install the streamer program, create a SplashTop account

1

2. Configure Security option to control how secure when connect to your server. I’ve added “security code”

2

3. Configure Advanced option by entering your Google Account so you can remote desktop to your server from anywhere. Default port is 6783

3

Configuration on your android tablet (example: My Nexus 7)

The following is the screenshot taken by using my Nexus 7 tablet. (please click the picture to view)

1. Enter the splashtop account that you’ve created in above step.

2013-04-01 19.46.27

2. Once authenticated, your Hyper-V server should now be streaming directly to your android tablet. Change the display setting or Just select your Hyper-V Server

2013-04-01 19.47.08

3. Enter security code that you’ve entered in previous step

2013-04-01 19.47.23

Sample Hyper-V Server screen

2013-04-01 19.48.002013-04-01 19.50.26

2013-04-01 19.51.36

Tips on using Splashtop

2013-04-01 19.57.05


2013-04-01 19.57.09

Give it a try if you got an android device. This is just one of tool that I use to manage servers from my Nexus 7. Enjoy!