Search This Blog

Thursday, December 31, 2015

Upgrade Veeam Backup and Replication V8 to V9

A day before New Year 2016!. We just received a copy of Veeam Backup and Replication V9, therefore we decided give it a try and  upgrade our testing lab environment which running on v8.

[ NOTE:-  Do not ask us about a copy of the installer. It will be available to public soon] Smile
In this post, we are going to share on how easy to perform an upgrade from V8 to V9.

[ Our scenario ]

Veeam Backup and Replication 8.0:  Version 8.0.0.2084


[ Pre-requisite ]
  • Stop / Disable all backup job

  • Install .Net Framework 4.5.2 on Enterprise Manager and Veeam  Backup Server. (included in the setup)
[ Upgrade ]
Insert installer media and perform an in-place upgrade in the following order
a. Veeam Backup Enterprise Manager (if you’ve this component installed)
b. Veeam Backup Server
c. Veeam Backup & Replication Console

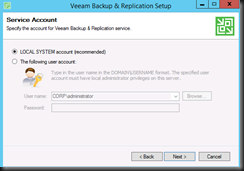
[ Upgrade Enterprise Manager Screenshot]


End result:-


[ Upgrade Backup Server Screenshot]


End result after upgrade:
  • Open Veeam Backup and Replication Console
Once console opened, Veeam will upgrade other components (Hyper-V Host, VTL, etc) which has previously connected.


Once components upgraded, you can enable backup job which you’ve disable previously and continue the backup.

That’s all for today. We have completed upgrade Veeam Backup and Replication v8 to v9 without any problem. To learn more about Veeam Backup and Replication V9 new features, please feel free to check out here.

Happy New Year 2016 folks ! Stay tuned for more post ..

Tuesday, December 15, 2015

Slide : Business Continuity With Disaster Recovery

During last week, Future Decoded KL event, we have presented a session on "Business Continuity with Disaster Recovery Using Microsoft Solution". We’ve covered:
  • Azure Backup to protect your data and application data
  • Azure Backup Services to protect Azure Virtual Machine
  • Migrate Vmware/Physical to Azure Using Site Recovery
  • Migrate Vmware to Vmware Using Azure Site Recovery

Picture


Slide

Monday, December 7, 2015

Ebook–Best Practices : Veeam Backup and Replication for Vmware

How does one become an expert in Veeam Backup & Replication? Sure, you can study all of the excellent user guides we have - which are fantastic at explaining all the functionality we have. However, they lack one important thing - real-world best practices on how to best deploy all this functionality. And a team of Veeam Solution Architects have done an incredible amount of work this year to address this.

During VeeamOn 2015, we as Veeam Vanguard received a hardcopy of this book. [Limited Edition]. So far we have enjoying reading it.

2015-12-07 07.52.01

Since it is limited edition, we cannot share this book. However, if you’re interested to read this book. Please feel free to get a hand on ebook from here.

Hope you enjoy reading it. Enjoy!

Thursday, December 3, 2015

Missing Storage Account When Configure Protection Group for Protect VMware to Microsoft Azure Using Azure Site Recovery (ASR)


We encountered missing storage account when would like to configure protect vmware to Microsoft Azure using Azure Site Recovery.

  • Configuration Server has deployed (Azure)
  • Master Target has deployed (Azure)
  • Process Server has deployed (on-premise)

image

[ Solution ]

We need to create Azure Storage depend on Master Target (MT) VM.

  • If create MT using D Series, must create Premium Azure Storage.
  • If create MT using A Series, must create Standard Azure Storage

After created Azure Storage, must set replication to Geo Redundant. Do not set to Locally Redundant.

image

Lastly, try to create protection again. Now you will be able to see Storage Account when protect a Vmware Virtual Machine to Microsoft Azure using Azure Site Recovery.

image

Saturday, November 28, 2015

Error “Online-Verify WinRM 3.0 service installed, running, and required firewall ports are open”


You are trying to manage a computer by using Server Manager on Windows Server 2012 R2. However encountered an error message

“Online-Verify WinRM 3.0 service installed, running, and required firewall ports are open”

after added new server.

Error

[ Resolution ]

On the new computer that you would like to add, execute the following command in Powershell:

winrm qc

step1

[ Final result ]

Click Refresh button on Server Manager. Problem resolved and you can manage your server from Server Manager.

solution1

Thursday, November 26, 2015

Force Refresh Azure RMS Template


By default, Azure RMS Template will refresh every day. To manually force to get a template, you are requiring to remove these settings from:

a) Delete the registry cache at HKEY_CURRENT_USER\SOFTWARE\Classes\Local Settings\Software\Microsoft\MSIPC\<GUID of connection>\Template

image

b) Delete the file system cache at %localappdata%\Microsoft\MSIPC\Templates (e.g. C:\Users\laiys\AppData\Local\Microsoft\MSIPC\Templates)

image

c) Delete the explorer right click cache at HKEY_CURRENT_USER\SOFTWARE\Classes\Microsoft.IPViewerChildMenu

image

Try to protect the document and you will able to view new Azure RMS Template has refreshed.

image

Monday, November 23, 2015

Restore Data from Azure Backup Services

Hey folk, anyone has perform restoration before after backup using Azure Backup Services?

Restoration is easy when existing server is still intact. How about when source server has corrupted due to avoidance circumstances and beyond from any repair options ?

In this post, we are looking into worse scenario and leverage on using Azure Backup Services to perform recover.

Before we start, you must have perform backup of application data by using Azure Backup Services from on-premise to Azure. Check out our previous post here on how to perform backup.

BackupServices

Let get started on recovery option.

Pre-requisite:-

  • 1st make sure you get ready your existing passphrase key (16 char). Without this key, you wont able to recover.

Passkey

Next, create a new virtual machine on Azure or on-premise either running same OS version or supported OS by Azure Backup Services.

Recover

If recover when target server = source server computer name:

  • On Backup vault, click “Allow Re-registration” of your protected server.

1

  • Install Azure Backup Services agents.
  • Enter same passphrase key

3

  • On Microsoft Azure Backup, click Recover Data and select This Server (same computer name)

4

5

If recover when target server not equal to source server computer name:

  • Install Azure Backup Agents
  • Click on Recover Data
  • Select Another Server and select Vault Credential

9

  • Select Backup Server (source server)

10

  • Enter correct passphrase key to decrypt

11

That’s all for today on different scenario that you can achieve to recover your data from Azure Backup Services.

Saturday, November 14, 2015

Solving Black Box When Remote Desktop

We encountered a problem where a lot of black box on the display when using RDP and Remote Desktop Connection Manager when access our virtual machines. This prevent us from seeing clearly and unable to click any icon.

We have tried to removed and update our display driver however the problem is still persist on our source machine. So now we sure it is not the driver issue but operating system issue.

Then we change RDP file to disable bitmap cache. Click on Experience tab and uncheck “Persistent bitmap caching”

image

Problem solved for RDP but still can see “black box” when using Remote Desktop Connection Manager. Too bad, we cannot find option to disable bitmap cache.

So we use another workaround by delete cache from our source machine. Go to

C:\Users\<username>\AppData\Local\Microsoft\Terminal Server Client\Cache

Delete all files inside Cache folder. Make sure no remote desktop connection is active.

Once we empty the cache, our problem solved for remote desktop connection manager.

Friday, November 13, 2015

Update Azure Powershell Version

Hey folk,

Microsoft constantly improve and update Azure Powershell and added new fix and cmdlet. Your version may be older version and getting an error when execute certain cmdlet. You can verify by typing the following command:

(Get-Module -ListAvailable | Where-Object{ $_.Name -eq 'Azure' })

| Select Version, Name, Author, PowerShellVersion  | Format-List;

image

Browse to https://github.com/Azure/azure-powershell/releases to check on latest version.

image

Our version is 0.9.8.1

and latest version is 1.0.1.

To update, you can download the latest windows installer.