Search This Blog

Monday, September 30, 2013

Enterprise Strategy Group (ESG) Lab review : Veeam Backup and Replication

Hi reader,

ESG has came out with ESG Lab review on Veeam Backup and Replication software. If you would like to get a hand on the report, kindly click on this link below:

ESG Lab Review. ExaGrid with Veeam: Virtual Machine Backup without Compromise

Hope it will be interesting and enjoy reading the lab review.

Wednesday, September 25, 2013

Oracle Certified Run on Windows Azure and Hyper-V


Nine years ago when I’m as System Engineer, I  still remember on my 1st experience on deploying Oracle 9 on Red Hat for 21 sites. Today we can do the same on Windows Azure and Hyper-V.

Oracle has finally certified its product to run on Hyper-V and Windows Azure. Here is the license software running in the Windows Azure cloud computing environment. You have an options to

a) create a VM and install your own copy of Oracle Software

b) Create a VM from Windows Azure Gallery with Oracle installed.

Click  image

Select Compute | Virtual Machine | From Gallery

image

Step 1:- select VM image

image

List of Oracle Software from Windows Azure Gallery

image

image

Oracle now also offers Oracle Linux, Oracle Linux with Oracle Database, and Oracle Linux with WebLogic Server in the Windows Azure image gallery for customers who are licensed to use these products.

Step 2:- Select VM Configuration

image

Step 3: Select VM Configuration

image

image

Oracle software VMs are currently in preview. During the preview period, Microsoft charge only for the Windows Server VMs that the Oracle software runs on, not for the Oracle software itself.

For more information, refer to Oracle Support Policy here.

Sunday, September 15, 2013

Managing StarWind Storage Using VMM 2012 R2


In this post, we are going to explore on how easy to manage Starwind Storage by using VMM 2012 R2. The solution offered by VMM allowed us to use SMI-S Standard to perform automatic storage management.

Products :-

  • Starwind iSCSI Storage version 8 Beta
  • VMM 2012 R2 Preview Edition
  • Physical Host running Windows Server 2012 R2 Preview

During testing, I have found the process of register Starwind SMI-S provider is much more easier compare to previous version with the help of GUI (execute command StarWindSMISConfigurator)

Step 1: Register StarWind SMI-S Storage

1st step is connect Starwind SMI-S storage. Make sure you have install the SMI-S Provider and configure using command StarWindSMISConfigurator. To connect use VMM Console, click on Fabric | Storage | Add Resources | Storage Devices.

image

A Storage Devices Wizard pop up. Select “SAN and NAS devices discovered and managed by a SMI-S provider.
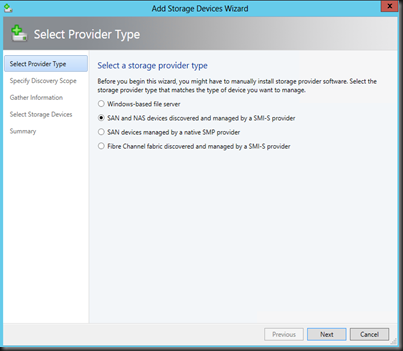
image

Do select Protocol:- SMI-S CIMXML, enter IP Address of the storage and Run As account. (remember to enable authentication on starwind iSCSI by setting enableAuthentication=true) in cimserver_planned.conf , create a local account and enter following command “cimuser –a –u (username) –w (password) . Note:- use the local account that you have created)
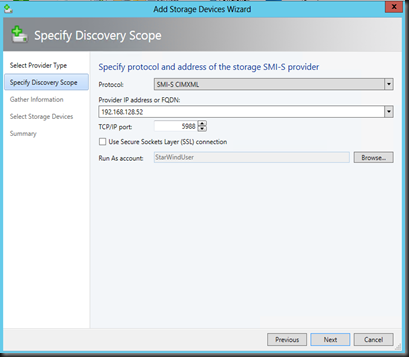
image

If the wizard successful to connect to provider, it will display all available disk array.
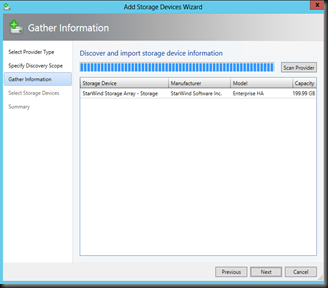
image

Select pool to be assigned to VMM and assign Storage Classification
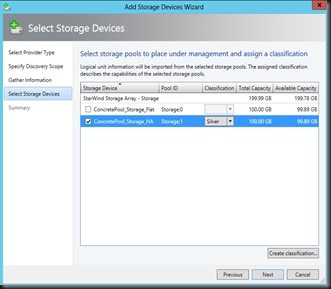
image

Review the summary and click Finish to add the Array

image

Step 2:- Create LUN

Next step is create a logical unit. Click Create Logical Unit

image

Select storage pool, enter the LUN name and the size

image

On the classfication, you will be able to view the storage pool and LUN that you have created.

image

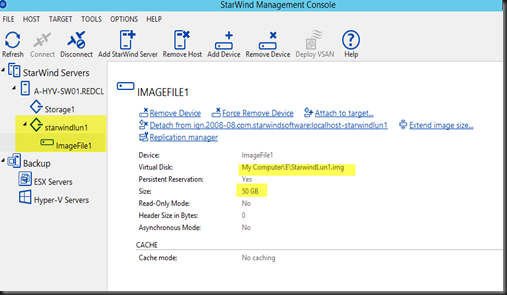
On Starwind Management Console

On  Starwind iSCSI version 8, the GUI has been reworked to simplify user experience.
image

Note:- use Starwind Mangement Console and check if LUN has created by VMM

Step 3: Allocate Storage Pool and LUN

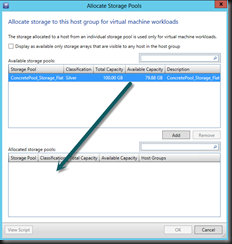
VMM allow you to allocate storage pool and logical unit to different Hyper-V host. Let start to assign storage pool and LUN by click on the icon Allocate capacity on the toolbar

image

Select your target Hyper-V host group

image

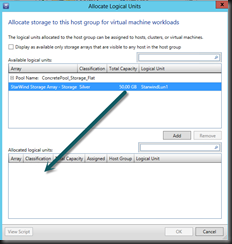
  • Select Allocate Storage Pool and add the pool
  • Select Allocate Logical Unit and add the LUN
imageimage

Step 4: Connecting LUN to Hyper-V Host

Once storage pool and LUN has allocated, the next step is connecting LUN to Hyper-V Host.

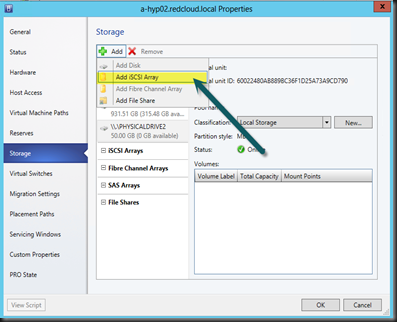
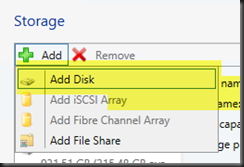
Go to the Properties of Hyper-V Host, select Storage, Click Add and select “Add iSCSI Array”.

Note:- Make sure iSCSI services on the Hyper-V Host is started before proceed with next step.
image

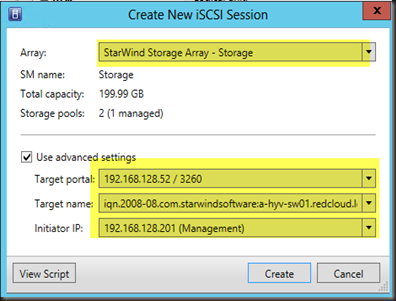
Then enter the iscsi session that you would like to create on the Hyper-V Host. Select entry as highlighted.
image

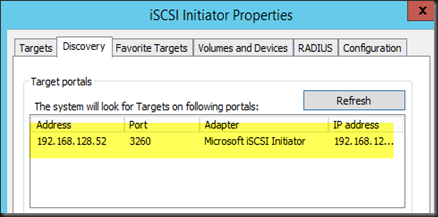
Once you click Create, an iSCSI Target entry is created. To verify, open Hyper-V host iscsi initiator properties.
image

From here you will notice that we are using VMM to create an iscsi connection.

As array has been added. the next step is add a disk to Hyper-V host
image

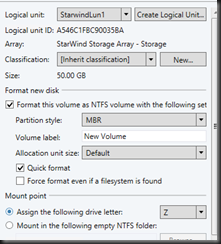
Select LUN, format the disk and assign mount point. Example:- Z
image

Now you have an additional storage presented to your Hyper-V Server. With SMI-S provider support in Starwind iSCSI SAN, you can perfom operation on VMM Console without using Starwind Management Console and hence simplify administration.

Friday, September 13, 2013

Calling Beta Tester


image

Calling Beta Tester, are you interested to be the 1st to test StarWind iSCSI SAN & NAS V8?

Beta 1 - available now!

  • L2 Flash Cache
    Works with RAM as a L1 cache to boost the efficiency
  • Log-Structured File System (LSFS)
    Eliminates random writes for VM storage
  • In-line deduplication and thin provisioning with space reclaim
    Reduces storage expenses dramatically and accelerates VM storage performance
  • Simplified and improved GUI
    Provides Windows Server 2012 style, step-by-step wizards and support of PowerShell scripting
  • Support of SMI-S interface for integration with Windows System Center R2
    Makes cloud storage administration easier

Beta 2 - coming soon
  • Massive scale-out up to unlimited number of nodes
  • Virtual tape library (VTL)
  • Asynchronous replication

image

I’ve sign up and will start my testing soon. Hope you will join us as well to test the product.

Wednesday, September 11, 2013

Building Windows Azure Pack Into Your Data Center–Part 4


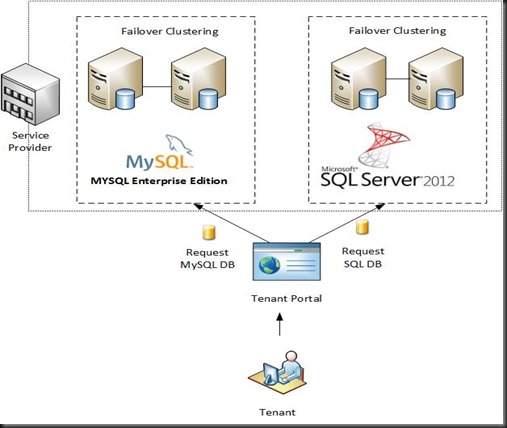
This post is part 4 of previous post where by we have use tenant portal to manage a provision VM. In this post we are going to move forward on our VM services and offer an additional services :- Database hosting services. With Windows Azure Pack, we can allow tenant to subscribe either MySQL or SQL database.

DBHosting

For Service provider, we encourage them to setup high availability database by configure

a) Windows Clustering and use MySQL Enterprise Edition

b) Windows Clustering and use SQL Always ON, Mirroring or SQL Cluster.

Once database has setup, Service provider can use Admin Portal to configure mapping to SQL Server or MySQL connection so Tenant can request for database services.

After configure the connection, do remember to add an additional services to existing / new Plan. Refer to previous post on how to create new plan.

Let check out on how Tenant subscribe database services.

Tenant Portal

After added Database into the plan, you will be able to see SQL and MySQL on the navigation pane (on the right)

image

Create SQL database

Click on +NEW | SQL Server Databases | Create Database

image

A wizard will prompt to enter database settings, enter your database name and click Next

image

Enter your database credential and click Tick (to create the database)

image

Create MySQL Database

Repeat the same process. Click on +NEW | MYSQL Server Databases | Create Database

image

A wizard will prompt to enter database settings, enter your database name and click Next

image

Enter your database credential and click Tick (to create the database)

image

Verification

It will take a while for the database to be created. Once complete, you will be able to view from the portal

SQL Server

image

Select the database and you will able to perform the following action.

image

View info – view the database settings. Your Tenant can use this settings to connect application to hosted database.

image

Delete – to remove the database

Change password – change the database admin password

Resize – Change the size of the database. Scroll to increase your database size (if quota allow)

image

MySQL Server

image

Select the database and you will able to perform the following action.

image

View info – view the database settings. Your Tenant can use this settings to connect application to hosted database.

image

Delete – to remove the database

Change password – change the database admin password

Let have a look on the backend database

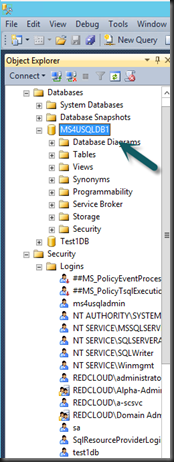
SQL Server

image

Connect to SQL database using SQL Management Studio

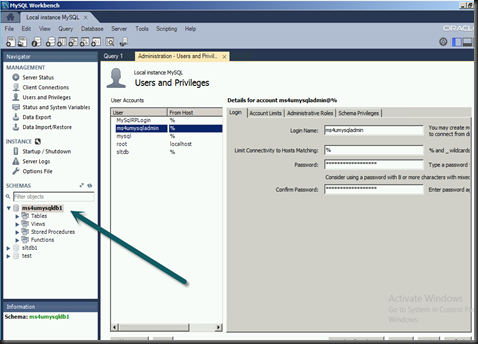
MySQL Server

image

Connect to MySQL database using MySQL Workbench

Previous post:-

Thursday, September 5, 2013

Veeam Backup and Replication v7 NFR License Key for Microsoft and Vmware Professional


A word from our sponsor: Veeam

Veeam NFR keys for Microsoft and VMware professionals are now available for the NEW Veeam Backup Management Suite v7.

Veeam Backup Management Suite is built from Veeam Backup & Replication to deliver the data protection, visibility and control you need for your VMware or Hyper-V environment. Please find the information HERE. Hurry while stock last.

image

Also want to ask you to help Veeam to win Windows IT Pro Community Awards! We are nominated in SEVEN categories. You can vote here http://www.surveymonkey.com/s/2013-CommChoice-WinITPro-FinalVoting

Wednesday, September 4, 2013

Building Windows Azure Pack Into Your Data Center–Part 3


This post is part 3 of previous post where by we have use tenant portal to provision a VM. Quite busy nowaday with several public speaking on sharing about Windows Server 2012 R2 and Disaster Recovery Solution. Guess what? I;’m writing this post when travelling to Sri Lanka. Without wasting any more times, in this post, we are going to look on options available after provision a VM.
Dashboard
On the dashboard, you can view your VM CPU percentage, Network IO/Sec and Storage IO/Sec. You can toggle to view either CPU, Network or Storage IO/Sec
image
You can customize to view the graph in hour basis, day or month.
image
Not only that, Tenant was able to view their subscription and quota from this dashboard. At this moment, tenant has used up 1 vcpu, 512MB of memory, 50GB of storage and 1 VM (out of 8 VM limit)
image
How about VM management? VM that has provisioned can be managed from the Tenant Portal. Action available is listed below.
image
Then if you would like to change the VM settings, you need to shutdown the VM and choose hardware profile which has assigned on the plan. For example:-
image
Initially, the VM was assigned 1 vpu with 512 MB of memory. You can select 2 vcpu and 1024 MB of memory. These two hardware profiles was defined during our earlier Plan Subscription creation.
Not only that, tenant can attach network, additional virtual hard disk and DVD to the VM as well.
image
Change VM connection
image
Attach virtual disk
Tenant has the options to add a new blank disk or data disk to the VM. You can select SCSI controller as well.
image
Attach DVD
If you would like to use any iso, you can attach an ISO. A list of ISO which available from VMM Library will be displayed.
image
Well, that is how a provision VM can be managed from Tenant Portal.
Check out Part 4 whereby we will explore on providing additional service offering such as  database hosting by using Windows Azure Pack.
Related post:-